stash reduction

a universe of stash by Katherine Hajer

Okay, maybe just a medium-sized galaxy...

Somewhere in my travels I came across the Sophie's Universe crochet-a-long. I've been wanting to do more mandala/surface crochet for a while, and the pattern looked like a great way to use up the ~2kg of white and cream odd-balls I have, plus a lot of other colours as well.

Even if I didn't like the pattern, the sheer amount of technical writing, reference links, and planning that went into the instructions for three (!) different versions is staggering. While the stitching for each of the three different yarn weights is the same, the colourways and checkpoint dimensions (as in, "if you have hit round X your work should be Y centimetres across") is very impressive.

Every single round starts with separate instructions for whether you are continuing with the colour from the previous round or starting with a new colour. Meanwhile, I've done 21 rounds and have yet to encounter a single error.

And, oh yes, the pattern has been fully or partially translated into seven other languages, plus one more language for a series of video tutorials.

And for this particular version? I've done a quick estimate based on the yarn pack information given in the introduction to the crochet-a-long, and I should be able to pull this one off entirely from stash. And still complete the stripey blanket from stash, even though they share some of the same colours (and yarn sources).

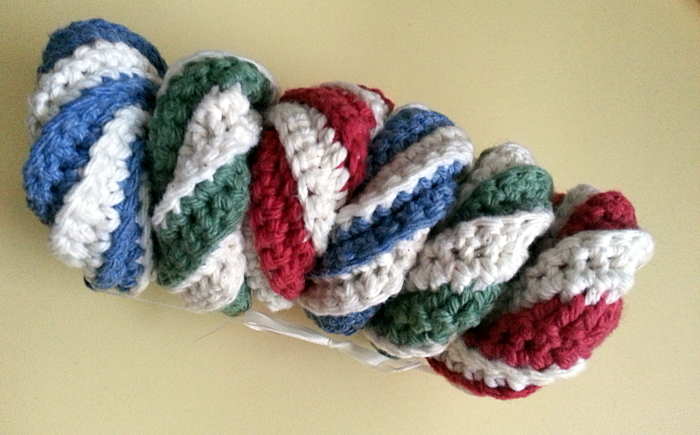
In the photo above, all of the colours are worked in single strands of worsted-weight yarn, except for the burgundy and cranberry, which are thinner yarns held double. The burgundy isn't even made of the same two yarns. Instead, it's a thinner 100% acrylic held with a thicker 100% wool. Now that they're crocheted together, it's difficult to see the colour difference even up close and in good light. Go figure.

This means that the weight of each particular round of work varies a lot, but so far Sophie has been lying flat and adjusting to the physics of each yarn type very well.

Since this photo was taken, I've started part 3. The rounds are getting big enough now that they take a while to finish. The completed blanket is supposed to be about 1.8m square, although when I've done gauge-check measurements the work seems to be coming out slightly too big for a change. Usually it comes out slightly too small and I have to either try again or improvise.

It'll be great to weigh the finished blanket and see how much stash I've used up.

a smaller mess by Katherine Hajer

Now that the latest gift makes are done and delivered for the spring, I have been working on larger, ongoing stash-busting projects. The giant stripey blanket is back in rotation, in part because the leftover yarn from the mermaid afghans can be incorporated into the colour scheme and used up.

While I was checking how much yarn I had already set aside for this project, I realised there was only this much left (plus the mermaid yarn):

Now, you may be thinking to yourself, "er, Katherine, that basket is completely full." But that's when I raise my shaking hands into the air and cackle, "Yes! But it's only one basket!". When I started the blanket, I had two baskets plus a shopping bag. So getting it down to one basket is excellent.

Is it making a dent in the actual yarn storage requirements? Yes and no. I mean, once it's done, the blanket will have used up a lot of yarn. The broadest periwinkle and pink stripes in the photo below are made from single 100g skeins — already it's a heavy blanket. And it'll mean that I don't have to store stash yarn in the main sitting/working area of my apartment anymore. But the bedroom yarn storage — the bulk of the stash — is in a sad state. There are already two more blankets queued after this one to keep stash-busting efforts up.

Onwards.

fiddle faddle by Katherine Hajer

Elizabeth Zimmermann had a way of giving the exact right name to categories of things, so much so that in the knitting world, a lot of the personal jargon she used in her books have become the standard terms. A favourite of mine is the "fiddle faddle" she dedicated a chapter to in Knitter's Almanac. In the book, Zimmermann provides patterns for little nets, used for holding oranges so they can adorn Christmas trees. There's also little knitted stars and other small, decorative items.

Zimmermann being Zimmermann, she also lists off some items which are fiddle faddle, but which, if anything, are less useful than Christmas ornaments. I remember this was the first time I'd heard of doorknob cozies which, sadly, seem to be becoming more popular again.

Coffee cup cuffs are a more recent invention for this category, and have a major advantage over doorknob cozies in that they are actually useful, protecting the user's fingers from discomfort and helping reduce waste by removing the need for cardboard equivalents.

I used a free pattern for a dress-up crown, and just reduced the number of pattern repeats until it fit around a standard take-away cup (20cm). The designer did a thorough job of writing out the pattern, but it hurt my brain, and I'm not sure the decreases are written out correctly, so I did some experimenting and came up with my own version... which looks exactly the same as her finished-item photos. I'm not sure I actually changed anything or not.

The leaf pattern is something I copied from a photo a while ago when I made a lot of cuffs at once. If you know how a basic aspen leaf motif works in knitting, it's not hard to reproduce. This cuff makes for a lot of ends to darn in (two per leaf), but it's not difficult to work and I like the finished effect.

The friend I gave the crown cuff to gave me a leaf charm she'd bought. She had several, and had intended to make a bracelet with them until she saw how big they were. I thought it looked like the dangle part of a bookmark, so I dug up some tatted and crocheted thread bookmarks on Pinterest and decided to try this graduated pineapple one (Ravelry, free pattern):

Mine is purple just because that's the first reel of crochet thread I came across that wasn't white. I figured white would just get grubby. The bookmark took the second half of Ant-Man and disc 2 of Archer season 3 to finish. It's a very straightforward pattern — once you see where the geometry is going, you hardly need to follow the pattern at all. It's also the first time I've done the very traditional pineapple pattern, so hooray for personal firsts!

Given how much stash yarn (er, and crochet thread) I have left over, I can see a lot more fiddle faddle in my future. Hey, so long as it's the useful, non-cringey kind.

mermaid aftermath by Katherine Hajer

After I finished both mermaid blankets, I had a lot of yarn left over. Lots and lots and lots. You can see it in the photo at the top of this post — weight-wise, it works out to:

  • 233g turquoise
  • 235g jade
  • 186g macaw (variegated) 
  • 410g peacock

That totals just over a kilo of leftover yarn. In fact, I'm just one skein short of the variegated to have enough to make a third mermaid blanket. I saw some comments on-line that the yarn estimates in the pattern are off, and now I have proof. It happens.

But no, I am not making a third mermaid blanket. That would be boring to the point of masochism.

Instead, I've been making some quick, small things to use up the yarn and get it out of the apartment as soon as possible. No net gains to stash!

I knew the most difficult yarn to get rid of would be the variegated. I like handpainted and self-striping yarn as much as the next knitter, but old-school variegated has always been... difficult. It has strong connotations with the items left over after the church bazaar, or gifts from well-meaning relatives you just couldn't get rid of politely.

The macaw called for in the pattern has the benefit that it isn't as ugly as the brown/gold/rust/white blends we saw in the 70s. I had a vague recollection of a feature set of patterns for self-striping/variegated yarn from a recent crochet magazine I'd bought, found the article in question, and stuffed the yarn in a tote bag before I headed to my hairdresser's. I picked a pattern (the Swoopy Cowl from Interweave's Crochet Accessories 2014) and started stitching between the colouring and the shampooing, and by the end of the following day I had a finished cowl:

I skipped the shaping and just made it straight-sided — it seemed like it would be too tight around the neck otherwise. This one is headed for the donation box since I don't need it and don't know anyone who wants it. I hope someone takes a liking to it.

Crocheted blankets are still of interest for me, because they are great for using up a lot of leftover yarn quickly. I tried out some of the square patterns I've been collecting on Pinterest:

I'm not completely thrilled with these, just because they're uncomfortably close to putting the "granny" back in "granny square", but they were all good exercises. The geometric-patterns square at the back and the mandala square on the left were both copied from photographs, and the flower square at the bottom right is a free pattern (Ravelry link). It's also my first attempt at crocodile stitch, so it was educational.

At this point, I have nearly all the variegated yarn used up (one more dahlia square should do it), but most of the turquoise, jade, and peacock solid-coloured yarn left over. I think it will go towards the stripey blanket I've had on the go for a while.

That's the next major stash-busting to complete: the two blankets I have on the go. There's always something.

functional failures by Katherine Hajer

I've had an idea to make slippers which look like sneakers for a while. There are some patterns around, but the ones that don't look terrible you have to pay for. Maybe it's just me being cheap, but I've yet to see a slipper design that blew me away so much I wanted to pay for it.

Fortunately, I did find a free, multi-sized pattern for loafers at Whistle & Ivy. I used them for making the slippers for my chiropractor's office, and I used them again for the sneaker slippers.

The great thing about the Whistle & Ivy pattern is that the construction is very shoe-like. That means that you can keep the sole construction the same and play around with different uppers shapes. Although the blog claims the sole is supposed to be a little smaller than your foot, I find the sole comes out much smaller. The pattern makes it easy to make the sole bigger, though — I just make the measurements comparable with a pair of commercially-made ballet flats I own. This time I also made triple soles, instead of the double soles called for in the pattern. I figured the extra layer wasn't a bad thing, and it makes the side of the soles closer in thickness to those on actual sneakers.

I'm pleased with everything about the sneaker slippers except for the white toe box, which is far too big. Next time, I'm going to make it shorter, and start the rest of the upper sooner, and make the tongue longer.

These are entirely made of stash. The bottom sole uses the same black wool as the upper, and the middle sole is some variegated yarn left over from when I made felted slippers. The inside sole is made from turquoise dishcloth cotton so my feet will stay dry. The white parts of the uppers and the embellishments (outer rim of all the sole layers, toe box, star applique, laces, red striping) are all acrylic. Meh. I hand wash all my handmade stuff anyhow.

In all, these used up two and a half balls of stash yarn, plus a little red yarn. Next time I'll use up a little less white, but use a different colour for the bottom sole so that I have more black for the uppers. In the meantime these count as a functional failure, in that they are wearable, just not exactly what I was aiming for.

double-knit coffee cup cuff by Katherine Hajer

Yule gift-giving works like this in my family: everyone gets all of the kids something, but the adults draw names at Thanksgiving (which is in October, because we're in Canada), and then get the person whose name they drew presents. We have a dollar amount limit, but it gets broken regularly for "stocking stuffer" things. Basically, you spend the dollar limit getting what the person asks for, and then... top up a little if you find something you know they'll think is cool.

This year I drew my brother Steve's name, which was great because I'm always seeing stuff I know he'll like, but I never seem to get his name. He likes the band The Descendents, and passed me along a link to their 2014 Christmas sweater last year. We joked about making a handmade version that was less Christmas-y, and then the idea just sort of dropped.

I forgot all about it until I was packing up the other stocking stuffer things I'd got him. There wasn't enough time to make a whole sweater, but I figured I could dig out some sock yarn from the stash and make a coffee cup cuff.

I copied the motifs from the Descendents Holiday Mug. If you zoom in and squint a lot, the stitches actually work out — for once it seems that a fake knit design was created by someone who at least understands how knitting works. Steve likes knitted fabric with small stitches, so I automatically reached for my 2mm needles and worked out everything else from there.

Sock yarn on 2mm needles works out to a dense but thin fabric, and I wanted something reversible — because who wants to fuss with right and wrong sides when you just want to insulate a coffee mug? — so I went with double knitting. Double knitting carries a risk in that the method creates very wide, short stitches, so any motifs you knit in also come out wider and shorter than they would appear mapped out on, say, graph paper or cross stitch.

At first I just did a sample square of Milo to find out my gauge and to see how bad the distortion was. The square turned out with Milo looking like Milo, but it was enough work that I decided to just finish it off properly and make it part of the gift.

After that, it was a matter of doing some math, checking various free coffee cuff patterns for measurements, and knitting the cuff itself. I sewed the button onto the edge of the cuff so it could be closed with either side facing out, and made the button loop long enough to accommodate different cup sizes — if Steve wants to put it around a narrower cup, like a take-away paper one, he can just wrap the loop around the button a few times until it fits snugly.

The sample square was too small to work well as a coaster, so I looped a fabric-covered hair elastic onto it and made it a tree ornament.

Coffee cup cuffs are usually considered quick gifts, but this one took around eight hours. It was fun working through the planning and execution, though, so I think it was worth it.

the week of crafting dangerously by Katherine Hajer

My youngest brother is getting married this August.

August in this part of the world tends to be very hot, and very humid. The first thing I said when I was told the wedding date was, “Congratulations! That’s fabulous! Is it all right if I don’t wear stockings?”

Besides not liking to have my legs encased in nylon mesh in 90% humidity, I also have sensitive skin which tends to get annoyed (read: itchy and painful) when metal gets next to it in warm, damp weather. Even metal arms on lawn chairs can set me off. Wearing fine jewelry (real gold or silver) should avoid it, but if there’s any nickel alloyed with it at all, I react. I seem to do better with silver, probably because of what it’s alloyed with.

While I was out buying a dress to wear to the wedding, I noticed that the shop carried a modernist version of oya, which are strips of lace once made to edge head scarves, and now are used on their own as necklaces or bracelets. Wearing 100% cotton, thread-thin jewelry in Toronto’s August appeals very much.

It so happens that Interweave Crochet did a special article on oya a few issues back. I made the purple and black version shown above to go with the dress I bought.

Bonnie, the office manager at the wellness clinic I go to, asked for an oya of her own, and so I made up this cream, brown, and grey-beige version:

The lighter colours show the construction method better. The cream large flowers are made first, then the brown backgrounds are added. Then you make the grey-beige ribbon, attaching as you go. The cream fan shapes are added last.

It took me two weeks to make my oya, but only a week for Bonnie’s — partly because I already knew the pattern by that point and could work more efficiently, and partly because she wanted to take it with her on vacation, so I had a tight deadline to work to. For once I tried to track my time, and it worked out to about:

  • 45 minutes per large flower centre

  • 45 minutes per large flower background

  • 30-40 minutes per ribbon segment between large flowers

  • 90 minutes for the fan shapes, not counting darning in ends

There are 10 large flowers with 9 ribbon segments between them, for a total length of about two metres. You do the math.

I’ve only done a very limited amount of thread crochet before, so these projects were good learning experiences. One of things I learned is that if you hit the index finger on the hand holding the work enough times with the point of a 1.25mm steel crochet hook, you will break the skin. Two days later it’s almost completely healed, but I had to make a point of washing it with antibacterial soap because it was starting to fester. Ouch! Next time I do this sort of thing, I’m going to try putting a thimble on my left index finger to protect it.

In case anyone is wondering what happened to my stash-busting efforts, erm, both of these were made from 100% stash. I didn’t even know I owned the grey-beige thread until I found it, misfiled with my knitting yarn, while I was looking for something else. Thread-crochet purists will notice that the purples and the brown are perle cotton while the other threads are odds and ends of different stuff, but it all worked out. The purple large flowers might need some ironing, even a light blast of spray starch, to encourage them to stay flat and not crushed in half, but that’s about it.

#craftblogclub spring gift swap! by Katherine Hajer

The spring challenge for CraftBlogClub was to make thing for a gift swap, using only materials one already had on hand. Having materials on hand was not an issue for me [glances guiltily around the apartment at all the yarn]. Katie Gets Crafty organised us into swap pairs, and Zoe Roberts at Oodlesofcraft was my swap partner.

Zoe lists sewing, knitting, jewelry making, and card making as her crafts of choice on her blog, so I thought it best not to do any of those. I stuck with crochet, which seems to be my main method of using up yarn these days. Since I didn't want to make any assumption about what Zoe liked and get it wrong, I made a few small things, in the hopes that one of them would suit her:

Hairpin lace scarf:

This is more or less the same as the one I made a few months ago, except in three colours instead of one. This time around, I wasn't sure I had enough of one colour to make an entire scarf, so I went with long, vertical strips joined by a contrasting trim. As before, each strip of hairpin lace is 300 loops each side. The edging is sc, ch 1 to give it some weight without being too rigid.

Tawashi

I found out about these from Pinterest recently. By definition, they're small, crocheted or knitted items you can use for scrubbing dishes. The swirled stripes pattern I made is very popular, but there are also ones in the shapes of leaves, rectangles, cartoon characters... they're sort of like practical amigurumi. There are lots of different free patterns floating around for these, but I think this is the one I wound up using.

Tawashi are supposed to be made in cheap acrylic so that they can withstand the rigours of pot-scrubbing, but they're so small and cute I thought they might be nicer for washing one's face. I made them in dishcloth cotton so they could be used either way.

Coasters

Crocheted coasters seem to be having a moment. The day I got the ribbon and other packaging materials for the gift swap, I found some commercially-made ones for sale, and patterns for them seem to be proliferating. Summer's practically here, so I decided to make a set of four for the gift swap as well — the night before I had to mail everything off to make the deadline (oops). They were definitely a last-moment decision, but I made all four in one sitting (2-3 Doctor Who episodes watched on Netflix). They're made from the same dishcloth cotton as I made the tawashi from, and flattened out more after I took these photos. The pin I got the photo from leads to here, but the subsequent link seems to be dead — Etsy just displays a lot of "similar items" which aren't similar at all! I just had a good squint at the photo and figured out a facsimile from there. The pattern as I made it is after the photo:

Four stitch tr cluster: *yo, insert hook in next space, pull up a loop, yo, pull through two loops, repeat from * three more times (5 loops on hook in total), yo, pull through all 5 loops, chain 1 to secure. (US four stitch dc cluster)

round 1: chain 6. Join with slip stitch to form a ring.
round 2: 12 sc in round. Join with slip stitch.
round 3: chain four, *tr (US dc) in next stitch, chain two, repeat from * to end, join to original chain four with a slip stitch.
round 4: chain 2, * make one four stitch tr cluster, chain 2, repeat from * to end, join with slip stitch.
round 5: chain 3, *make one four stitch tr cluster, chain one, tr, chain one, repeat from * to end, join with slip stitch. Change to contrast colour if desired.
round 6: chain 1, 2sc in each chain 1 space and one sc over each stitch of previous round. Join with a slip stitch.
round 7: chain 1, sc 2, inc in next st, *sc 5, inc in next st, rep from * around, end with sc 3. Inc should be placed on top of row 5's cluster stitches. Finish off.

#craftblogclub challenge: hairpin lace by Katherine Hajer

This month's challenge for #craftblogclub was to try out something new. I'd recently found all the pieces to my hairpin lace loom again (long story), and since I'd never actually made anything from hairpin lace, I thought it was about time that I did.

I pulled out some vintage 80s yarn from my stash — some Scheepjeswol Voluma I'd picked up at a fundraising sale for the Textile Museum of Canada — and started making loops. I guesstimated that three metres of loops would make a two-metre-long scarf.

That worked out to 600 loops per strip (300 to a side). This is hairpin lace at its most soothing, yet most unrewarding. The basic loop-making stitch is very simple, but you need guide yarn to keep the strip from tangling on itself, plus it's a good idea to tie at least one side of the loops into clusters of 50 so you can keep your count straight... it looks messy, and unwieldy, and like you're going to use up a lot of yarn just making a tangle.

But then all of the 600 loops are finally made, and it's time to do a joining pattern. I just used a simple fan pattern, which was included in the instruction booklet that came with the loom. The pattern is four groups of three loops, then one group of twelve loops. The pattern gets reversed on the other side of the strip. The loop joining went very quickly. It took less than a quarter of the time it took to make the loops in the first place. It is good after the discouragement of making the big mess of loops to obtain the final effect with relatively little effort.

I made two strips, then joined them together with small UK treble crochet (US double crochet) clusters. The result was a scarf which was, sure enough, about two metres long, and about fifteen centimetres wide.

The point of the exercise was to learn a new method and to decrease my stash by at least a little bit (the scarf used up about a ball and a half of the Voluma). I brought it in to show Bonnie, my chiropractor's office manager, and she liked the scarf so much that I gave it to her. So it was a win-win — I love it when that happens!

I like the look of hairpin lace when it's finished, but it's a bit of a one-trick pony. Certainly it's a good way to use up either ribbon yarn, or, as here, yarn with some fuzz to it — any type of yarn has some texture and interest to it on its own, so that it looks nice in those loops. I'd like to try making medallions (circles of loops) next time.

All of the scarf photos here, incidentally, are taken in the waiting area of the Beaches Wellness Centre's offices. I love how the wood planking looks behind the yarn!


crochet as decluttering by Katherine Hajer

upload.png

About three years ago, I got the Knit that Shit idea, which was intended to focus on both stash reduction and WIP reduction (erm, okay, make that UFO reduction). There have been some successfully finished objects, and some permanent unravellings too, but overall progress has been made. 

One of the items to be finished was a Kaffe Fassett Red Diamonds jacket:

This is one of my favourite Fassett colour patterns, and I had a lot of fun picking through the stash, finding colours that would work. But: in three years, I never made it past what is shown in the photo. Although the knitting is quicker than someone who's not into intarsia might think, I found every time I had to add new colours I wound up pausing for a very long time, getting lost in all of the possibilities and worrying I would have patches which were too dark or too light. I also worried that I wouldn't get a lot of wear out of the finished item. For my own personal tastes, I'd be more likely to get wear out of either a very large, swingy coat in this sort of patterned fabric (such as Fassett himself makes in different colourways and patterns), or else as a shawl. The boxy jacket I'd started wasn't the best fit with my wardrobe.

Add to that the general decluttering drive I've been on and... I decided to throw out the half-piece I had done (sniff) and use another favourite Fassett idea — random stripes — to use up the project yarn in a hurry. I had a lot of different odd balls of reddish and blueish colours set aside. So I did a row of foundation single crochet until I thought I had a nice width for a blanket, then started working rows.

The results thus far are in the large top photo. The idea to use granite stitch came from Erika Knight's Simple Crochet book. The stripe height is determined simply by how large each ball of yarn is — a 100g/200m skein makes about fifteen rows. The only rule I'm sticking to is that the reddish and blueish yarns alternate.

Granite stitch is often compared to knitted fabric. I don't quite agree — the density is still about the same as for single crochet — but it is far more flexible and drapey than regular single crochet, and not as gappy as, say, granny shells or double crochet in general. It looks the same on both sides, and makes a great blanket fabric. Just as well, because the granny square afghan I made less than two years ago is already showing signs of serious wear (and has been mended once). So much for acrylic yarn lasting longer.

rapid prototyping by Katherine Hajer

Toronto is in the middle of the annual "deep freeze" part of the winter — where air masses migrate south from the Arctic and make the local temperature very cold. We've been in the -10C to -15C range for a week, with the wind chill making it feel more like -30C. It's finally warmed up to around 0C today.

But that got me thinking of slippers. My hairdresser has a basket of slippers by the salon entrance so people can remove their wet, slush-covered boots at the door and wear a pair of dry, comfy slippers while they're getting their hair done. I mentioned it to my chiropractor, since her office has hardwood flooring, and proposed I make some slippers out of leftover yarn for the waiting room.

The criteria:

  • Use stash yarn only (so I clear more stuff out of my apartment — there's my selfish motivation in all this)
  • Unisex styles and colours
  • Durable (long lifecycle — I wanted to make them and then not have to worry about making replacements for a long time)
  • Machine washable
  • Last but not least, they had to appeal to people who are not necessarily into the whole "handmade" aesthetic. I didn't want anything that gave a first impression of, "ooh, saw something like that at a charity sale once. It was really ugly."

There are lots of slipper patterns around. Remarkably few of them meet the criteria, especially that last one. And while usually I'm all for vintage, a lot of these patterns were good reminders that not everything about the 1950s and 60s was chic and elegant.

My first attempt were some "ballet flat slippers" that came out looking like Archie Bunker's grandmother made them as something for someone to wear as punishment. Partly it was the colour scheme I chose, partly the textured stitches (which leave big holes between rows when worn).

Also, even though the slippers were entirely crocheted, they didn't feel very substantial. I could see the soles wearing out very quickly.

Bottom line was, I just didn't like them. So they got ripped out, and I went pattern hunting some more.

Eventually I found a pattern for crocheted loafers with two-layered soles and parts of their construction modelled after shoe-making. I thought the results were acceptable:

I like how the inner sole colour peeks out just below the upper. The pattern came in a wide range of sizes, and the results are shoe-like enough to calm everyone but the most pro-factory slipper-wearers.

Being crocheted, the yarn consumption is relatively high for the results. That's fine for the soles, which need the fabric density anyhow, but I wondered if there were other options for the uppers. I tried making a basic "kimono" upper, and was pleased with the results.

Funny thing: the inner sole and the stitching holding the two soles and the upper together are recovered yarn from those ugly slippers I started with. These got worked on in public a bit, and I got some nice compliments on the colour combination. Maybe it was the pattern all along, or maybe adding the red helps.

The nice thing about the knitted upper is that it's just a plain rectangle, and only about twenty rows high, including the border. Although I think this prototype worked, next time I make slippers like these (um, next Tuesday night, most likely), I'm going to make the uppers about four rows higher so that the overlap at the front is more pronounced and so that there is slightly more coverage at the back of the heel.

I made the knitted upper so that the stitch gauge was approximately the same as the stitch gauge on the crocheted soles. That way, when I was slip stitching everything together, I could count on matching one knit stitch to one inner sole stitch to one outer sole stitch. There was a little bit of easing when I got to the toe, but not much.

The completion of the first pair of kimono slippers led me back to loafers. In the original pattern, you are supposed to make the top part of the toe box as a separate piece and then slip stitch it to the upper, easing to fit. It felt awkward to do, and was a little tricky since the toe doesn't actually fit in place.

On my next pair of loafers, I experimented, working U-shaped rows and matching decreases to the increases used while making the soles. It took two tries, but I was able to finish the toe box without breaking the yarn. I think I'm going to make all the loafer-style slippers this way from now on:

In the meantime, while I was making all of these, it occurred to me that it would be good to provide a basket to put them all in. So I found a pattern on-line, grabbed four mismatched skeins of white acrylic yarn from my stash, and had at it. In about two and a half hours, I had crocheted as far as I could with the four skeins without running out of yarn:

Now I just have to make enough slippers to fill the basket!

knitted vampire squid by Katherine Hajer

My friends Cheshin and J-A both said that the last post about the swirl jacket made it look like a vampire squid. Right, even better than the black hole metaphor!

For reference, here's a video about vampire squid:

And here's the most recent photo of the jacket:

Just to explain what's going on with the jacket: the slot in the middle is the lower edge of the neck/lapels. The part that's still on the needles is the upper back and the beginning of the sleeves.

I had the jacket with me while J-A and I went to Word on the Street last Sunday, and she remarked that the jacket looked small. I think it looks small too, and have been nervously pulling at the fabric every time I'm sitting with it but not actually knitting. I'm heartened by how the fabric's own weight makes the welts stretch out, and by how I can stretch each section to well past what its official measurements are supposed to be. Still, it's a bit of a nail-biter. I've decided to press on, because even if I wind up ripping it all out again (still not beyond the realm of possibility), I'll have a better idea of how the engineering works. I've made a circle-shaped jacket before (by Annie Modesitt), but that one was worked from the inside out and had raglan sleeves knitted out from the body. This is a different sort of construction altogether.

I checked out other projects of the same pattern on Ravelry. It was good to see how the jacket looks on women who are not professional models, and there was a lot of constructive commentary about the pattern itself. So far I have two issues with this and all the rest of the patterns in the book: although many measurements are given for various parts of the swirls, the two crucial ones that are missing are a) the diameter when worn and b) the armhole height. I'm making one of the swirls in the "centred circle" section, just because they seemed to be the most basic shape and the best place to start. I would like to make an "off-centre oval" swirl, because I want wider fronts and narrower lapels. The problem is, all of the off-centre oval swirls have "slim, tapered sleeves", which sounds an awful lot like "won't fit anyone who isn't a living stick insect." How slim is slim? How tapered is tapered? How do I stop it from being tapered if I don't want that? Can I just follow the sleeve part for a non-slim, non-tapered sleeved swirl instead?

I'll have to knit on and find out.

knitted event horizons by Katherine Hajer

The swirl jacket has been in progress for two weeks now. As I write this, the original 609 stitches have now been reduced to 432. That might seem like it's still a lot, but after working 11 rounds of 608 stitches, it feels like things are moving at light speed. 

The swirl is the knitting equivalent of a black hole. At first you use up yarn quickly (a 100g skein in 12 rounds), but it seems like things are moving very slowly. Where I am now, just past halfway to the centre, the rounds are getting completed quickly but yarn consumption has slowed. Because so much yarn got used so quickly at the start, though, the work's already quite heavy — 400g.

This was the tricky part.

This was the tricky part.

The weight's an interesting factor. I'm counting on it to stretch the swirl out. Even though my gauge measured bang-on correct when I started (honest!), it's a little tight right now. Enough to make me worried, but not panicky. Each side of its octagon shape is supposed to be 43cm, but they're more like 40. I'm putting it down to being squished on the circular needle. Fingers crossed the fabric will relax to the right size (or slightly bigger) during blocking. 

I don't usually block non-lace items, but the construction method of the swirl seems to warrant it. For a pattern that's just knit/purl, increase/decrease, it does raise a lot of issues about knitting and geometry. 

serendipitous stash-busting by Katherine Hajer

One of my goals for this year was to use up the rest of the stash yarn I got when I was birthday yarn-bombed. I weighed the yarn, estimated the yardage (no ball band, so I'm not 100% sure what it is besides worsted acrylic), and decided there was enough there for something for Niece the Elder. She's 5 and likes anything "rainbow", so I knitted up a square and showed it to her. She said she Yes! she liked it, and Yes! she would like me to make something for Yule for her with it. I showed her a picture of the Flower Cardigan that J-A recommended to me, and Yes! Niece the Elder liked that too.

I must have caught her in a good mood. Still, I have buy-in for the present, and that's important. I don't like to work for hours and hours on something and then spring it on someone without being very certain they will like it.

The cardigan starts in the centre of that flower motif you can see in the photo above, and then expands from that point to create a raglan, cutaway cardigan. I don't have buttons for it yet, but here's the front:

This took me almost exactly two weeks to knit. Most of the discussion on Ravelry has praised the directions. Personally I found them a little overwritten, but that's the trend these days. I skipped some sections and just did what I thought made sense, and 90% of the time that's what the directions said to do anyhow — when they didn't, such as the button band/lower border rib, you can't tell I altered anything. The biggest alteration was that I was using worsted weight instead of the stipulated DK, so I made a size 4 in order to get size 6 results. I just followed the size 4 stitch counts and the size 6 measurements, and it all worked out.

There's an adult version available, which will be tempting to do at some point.

Best of all, it used up almost all the yarn!

strawberry steampunk... and a sock by Katherine Hajer

Earlier this spring, I had an idea to use up some of the acrylic worsted I inherited from my grandmother, and make an afghan. Afghans themselves can be rather boring unless there's an interesting angle to them, and after some consideration I decided to try to make this one fit the steampunk aesthetic. Okay, mostly because I had a big skein of burgundy to use up, but hey, inspiration comes from everywhere.

I found a suitable spiky/gearsy block to make, and started off...

...only to figure out I really hated making this block. The grey-purple "floating" shells involve several two-colour rounds with some awkward hook manoeuvres, and produce elements which look like they need to be scraped off and checked under a microscope. The block itself took forever to do. Blech.

Lately there's been a lot of buzz around the African Flower/Paperweight Granny motif. I liked the look of it, and especially liked that you can hook up one in only four rounds (not counting the joining border). So I tried a bunch of different combinations, based on how much yarn I had in each colour:

Much better, in my humble opinion, and the long stitches on the final round still give it that gear effect when worked in these colours. (It seems like the big trend is to work it in bright, clear colours, which I am so not doing. Oh well. Still works.)

I joined some blocks together, just to get a sample big enough to calculate the final afghan size:

I like how the final round of the motif shows up when it's edged by the joining border.

If I've done the calculations right, I'll need 87 blocks to make a 45x150cm afghan. I'd like it to be more like 170cm, but I'll have to see how far I get before I run out of yarn.

Meanwhile, the socks I started before the Iceland trip are back in active rotation:

It'll be nice to get these done — this is still only the first sock.

It'll be nice to get everything done.

an act of spontaneous millinery by Katherine Hajer

The last few rows of the souvenir Icelandic shawl were hard to get through. Each row was taking upwards of fifteen minutes to complete.

Last Saturday my youngest brother had the family over for lunch, and I didn't want to be mucking with hundreds of stitches, on a streetcar, in a heat wave. So instead I crocheted a hat:

The pattern is the Zelda cloche from the Spring 2014 issue of Interweave Crochet. The hat is worked sideways, instead of the usual bottom-up or top-down, and it actually fits very well (see the previous link for a photo of a model wearing it).

The lace motif is only on one side, although it wouldn't take much to make it symmetrical and on both sides. The total working time was only something like four hours, which is pretty good considering over two-thirds of it is rows of single crochet.

As for the yarn... it's left over from a shawl I made my mum last year. It used up just over the half the yarn I had left, and was a good reminder that sometimes stash-busting happens one small item at a time. With the grey yarn left over from the Icelandic shawl, I'll have a new hat/scarf/glove set.

yarny retaliation by Katherine Hajer

As you may recall from the last exciting episode of this blog, right before I went on vacation, my co-workers yarn-bombed my cubicle for my birthday.

Now: I absolutely cannot have more yarn in my apartment. It's already a major problem. I'm already enacting desperate measures to lessen the stash I have.

So I figured this was a good opportunity to use up yarn just come through the front door and stash-reduce a bit at the same time. I started before I went on my vacation to Iceland, got right back to it as soon as I returned, and worked throughout the week. And when I was done (about ten minutes ago), this was the result:

What you see in the above photo are six leaf-shaped facecloths, six leaf coffee cup cuffs, and six broken-rib, buttoned coffee cup cuffs. The creamsicle variegated, cream with pastel flecks, and lavender yarn are all from the yarn bombing. The rest is stash-busting, and it would be nice to say it made a dent, but mostly it just kept things at the status quo.

The broken-rib cuffs are my own pattern, as much as such things can even be a pattern. I wanted something that was interesting-looking, quick, and not too stretchy, but a little bit. The "pattern" goes like this:

  • Using worsted-weight yarn and 4.5mm or so needles, CO 15 sts.
  • Row 1: K across.
  • Row 2: K1, *yf, sl 1 pwise, yb, k1, rep from * to end. Note: yf and yb do not go over the needle, just between the points.
  • Repeat Rows 1 & 2 for about 20cm (38 repeats for my gauge). Check against a sample coffee cup — this part should reach around the circumference with very little overlap. Note that the stitch pattern tends to be tighter at one row-end than the other — this is okay, since coffee cups are cone-shaped anyhow, and gives your cuff a shaped top and bottom.
  • Buttonhole Row: K3, *sl 1 st pwise to right-hand needle, sl next st pwise to right-hand needle, lift first st over second st, rep from * 2 or 3 times, depending on your gauge and the width of your buttons. CO 2 or 3 sts (the same number you cast off) using the thumb or cable method. K3 or 5 (again, depending on how many you cast off for the buttonhole), then work another buttonhole. K3.
  • Next row: work row 2 per normal, treating the CO sts just like normal sts (some will just be slipped. That's okay.).
  • Repeat Rows 1 & 2 twice — 5 rows above buttonhole row. Cast off. I used a backstitch cast-off so the ends would match nicely.
  • Finish ends and sew on two buttons.

Tomorrow all of these will get randomly placed on people's desks, and I'll send out an e-mail to the team explaining where they came from and how it's using up the yarn bombing. I still have about 300g of variegated acrylic to use up, but that hasn't told me what to do with it yet.

For those who will want to know: each piece takes about forty-five minutes to make. The broken-rib cuffs are slightly faster to knit, but have the extra time for adding the buttons on. The leaf cuffs are probably the fussiest, because each of the four leaves is self-finished, which means there are eight ends to darn in at the end, plus one seam to sew the first leaf to the last. Each 50g skein of Bernat cotton yielded one facecloth and two cuffs, with only three or four metres left over.

This little mini-project shows how much I'm into the aspen/birch leaf motif lately. I get the feeling there will be more examples to come.

Important note: I love comments! But right now my web host has a bug with comment logins. Please feel free to leave a comment using the Guest option. You'll be able to ID yourself, mention your web site if you like, and say what you want to say!

this aggression will not stand! by Katherine Hajer

Tomorrow is my birthday, but I took it as a vacation day.

It's departmental tradition that people get their cubicle decorated on their birthday. Yesterday my co-workers gave me a cool see-through balloon (above), and a purple orchid I'm keeping at work so it gets some sun, and we had cake:

And I thought that was a very nice way to celebrate a co-worker's birthday, and was grateful they remembered.

Then today, the two people who are covering my work while I'm on vacation next week insisted we have a meeting to finish the knowledge transfer right before lunch. 

It's okay, I said. You know I'm going to send you a detailed e-mail with all the info. Don't I always? And we can meet in the afternoon. It's all cool. I just want to get something done so the person I'm sending it to isn't waiting on me.

Nyuh uh, they said. This time works best for us.

So I went to a meeting room and showed them what state all my documentation for all of my CRs was in, and when I came back to my desk it looked like this:

I got yarn bombed. With acrylic.

And sure it's all lovely and fun and colourful and birthday-ish, but it's a bombing.

And you know what that means.

Yarny retaliation is on the way.

Important note: I love comments! But right now my web host has a bug with comment logins. Please feel free to leave a comment using the Guest option. You'll be able to ID yourself ,mention your web site if you like, and say what you want to say!