finally by Katherine Hajer

Some things you get to right away. Other things you don't.

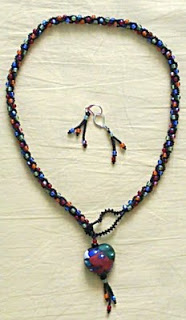
I am the proud owner of a quartz bracelet that was custom-made for me. Each big piece of quartz represents a full moon — there are thirteen in total on the bracelet, or a full year's worth. The jewelry artist added in some small round quartz beads in between some of the quartz chunks to make the chain long enough for me (she joked those represented the eclipses).

One day at work, when I was in the washroom, I flexed my wrist when the bracelet was mostly down around my hand and one of the links broke. Luckily I was able to find the one chunk of quartz that fell off and the two halves of the bracelet.

That was over five years ago.

I'd already been making my own jewelry for a while by then, but wasn't very comfortable with making wrapped loops, and wasn't sure I could do the fine work required to make a new link for the broken piece. But I bought different types of wire, figuring one or the other would work. I even brought the bracelet to a local jewelry shop that claimed they did "all kinds of repairs" (they made faces at it and went back to talking about custom engagement rings with another customer).

I've started to plan out repairing it myself several times, but I'd get as far as pulling out all the different kinds of wire I'd collected, determine that none of them were even close to the wire used in the bracelet, and give up.

Then, last night, I was reading a back issue (September 2008) of Canadian Beading, and came across Cheryl Laakes's Victorian Gothic Cuff pattern. The pattern calls for you to string beads onto a head pin, make a wrapped loop, and then clip the head end off the pin and make a second wrapped loop.

When I pulled out some spare headpins I had, they were a little thicker than the wire in the bracelet, but a lot closer than anything else I'd seen.

It took three tries, (remember, I'm more into working with beads than wire), but I got it to work. The result blends in a lot more than I thought it would, and because I had to wrap six loops instead of just two I'm now more confident about my abilities to wrap tiny lengths of wire with special pliers.


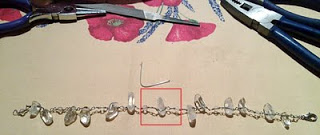
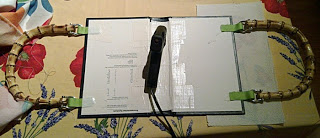
The box highlights the replacement link. In the background you can see a leftover headpin and some of the tools it took to get this to work.

It's weird —I'm so happy about getting to wear my bracelet again it's almost a non-event. Mostly I want to be sure to change the wires on the matching earrings...

how to fight back when things suck by Katherine Hajer

I've been trying not to whine about it too much on-line, but since the last week of this April I've been having problems with my shoulders and upper back (hence the long gap between blog posts, amongst other things). Since I'm not very good at just lying down and watching TV, I got bored very quickly, despite the pain. As soon as things started getting better, I was looking for ways to make stuff without disobeying my chiropractor and sabotaging the healing process, but which would help me from getting stir-crazy as well.

The main problem is in my left shoulder, which is the "power source" when I'm knitting, so that's been out until recently. I crochet right-handed, though, and I knew I could do that whilst reclining to support my neck and head, so I tried that.

I've been learning all sorts of things.

The first thing was that I need to learn to adjust crochet patterns the way I do knitting patterns. I made this lace cardigan:

There was something out of whack about the original sleeve length. I have longer-than-normal arms, but the original arm length went well past my knuckles (and yes, I was getting the right gauge). I took out two rounds of shells — almost three inches —to fix that. The waist/peplum is in the wrong place (see how the bottom three rows of shells run in the opposite direction?), but since I plan to wear is just buttoned at the bust, that's okay. The button, incidentally, replaces the ribbon closures called for in the pattern. It's still girly and less of a pain to take on and off.

I wanted a non-jacket that would let me look pulled together when it was wiltingly hot outside, and I think this fits the bill nicely. The yarn, incidentally, is Patons Grace mercerised cotton fingering weight, and since most of the stitches are trebles it worked up quickly.

I also learned a form of bead crochet:

My mum gave me the multicoloured pendant bead a while ago, and I had this idea of putting it on a spiral rope for a while though. For some reason I have a hard time stitching spiral ropes. I'm not sure what I'm doing wrong with the stitching part, but this loop crochet method works up faster and is easier to work. It's hard to see in the photo because the seed beads are black, but the results are similar to a Russian spiral. Each loop has four size 11 seed beads and one 4mm coloured bead. I arranged thing so that the blue and green beads alternated in one spiral path, and the red and orange beads in another. The pendant had its loop and fringe added while it was still separate from the main necklace rope, and the peyote stitch loop has to be that big to accommodate the pendant.

This is one case where I really like having the pendant at the front, although of course it could be worn "backwards" with just the rope part showing in front and the pendant hanging down the back, too.

I'm really inspired by this beaded crochet stitch. I've even got two more things on the go using the same stitch — all to be made in a reclining posture, of course.

a way east easter by Katherine Hajer

I have two nieces. On Easter the eldest one was two and a half years old, and the youngest one was three weeks. So neither of them are into chocolate much yet.

I got told to buy them picture-books, which was perfectly cool by me, but picture-books look so lonely in a gift bag. The stupid bag keeps collapsing.

Then I remembered this Chinese zodiac amigurumi set of patterns that knit.1 magazine published a while back. It's now a free pattern to download (that's where the link goes to). I took the Year of the Rabbit pattern and Eastered it up into two dolls, one for each niece. The only mods necessary were to embroider the faces instead of using the recommended buttons, and to add the neck ribbon/flower to make them look more seasonal. The flower petals are tacked down so that little fingers can't pull them off.


I used dishcloth cotton for the bodies and neck decoration, and the faces are embroidered with cotton floss. I wanted something that wouldn't taste/feel yucky if a little one decided to teethe on an ear or an arm, and to make them more washable.

They were quick and unfussy to make, good TV crocheting, and I got a kick out of using a Japanese crochet aesthetic to appropriate a Chinese zodiac symbol for a European holiday.

comfy by Katherine Hajer

I just got back from a 10-day business trip to Orlando, Florida. It took some serious clothes wrangling to find ten days' worth of office-ready clothes in my closet, and more wrangling still to fit them all in my suitcase.

One of the things I decided to do for the trip was finish off this recycled-cotton pullover I've been working on:
The pattern can be found free on Knitty here. The original was made in wool, but the simple lines made me think that it would be good for cotton too. The shape is a wonderfully flattering A-line, the armholes are low enough to be comfy but high enough to be elegant, and it has those neato-keen pleats at the neck and on the slightly belled sleeves (the back has darts that imitate the pleats without adding bulk). The vast majority of the knitting was just that wide 2x6 rib that you can see forming the vertical lines. And yes, the back does work out to be wider than the front, which in wearing means it's also longer, but that keeps it from riding up, so I'm fine with that.

The recycled cotton was from a "sweater's-worth" kit that I picked up from Summit Yarns in the early 00s, right before they went out of business. The idea was that you would knit up a largish swatch in the stitch pattern you wanted to use, then machine-wash and -dry it. The yarn would shrink (mostly lengthwise — denim yarn is famous for this), and you would know your finished gauge. You could then knit the sweater to the finished gauge, and have a machine washable sweater made out of eco-friendly yarn.

Knitting the sweater was a breeze, despite the 20% increase in all the lengths I had to knit in. The yarn itself was kind of like knitting with cotton kitchen twine — not unpleasant, but not exactly "luxurious" either. It's an artifact of how quickly our "green" sensibilities have changed. While part of me is glad it's made from recycled fibre and is unbleached, another part is shrieking, "I have to throw this thing in the dryer to make it keep its shape? I never put clothes in the dryer!" Oh well, it seems to be happy being washed with the towels.

I still have another Summit kit in a hemp/cotton blend that knits up to about the same gauge.

insanity by Katherine Hajer

One of the things I had planned to make over my winter holiday was a new pair of plain black mittens. When I make plain mittens, I use the same Patons leaflet pattern I have been using since I was twelve years old — I think it's called "Two Needle Mitts for the Family" or something like that. I almost have the whole thing memorised, and can do a mitten in about one round trip on the streetcar between the Beach and downtown.

Instead, I wound up making these:
They took a bit longer than a couple of streetcar rides.

The mitten and gauntlet pattern are from different examples in Anna Zilboorg's Magnificent Mittens, and the only saving grace of the whole thing (besides that I can keep my hands warm to about -25C with ease now) is that I used up a nice chunk of stash yarn. I deliberately chose the patterns to maximise the stashbusting — I had more red than black left, and that dictated which patterns I knit.

I wasn't paying attention to row counts when I picked the gauntlet pattern. I just cared about the proportions of the background and foreground. Most of the gauntlets in the book go a few inches past one's wrist — enough to go over a coat cuff nicely and block out the wind. These gauntlets go almost all the way to my elbow, and I have long arms! I feel like a superhero with some kind of DIY angle to their identity when I'm wearing them. They sag a little when I'm walking with my arms hanging down naturally, but they still stay over my coat cuffs, so that's fine.

The second time I wore them, I got the best compliment a DIYer can get from a stranger. A lady came up to me and asked me where she could buy a pair. I gave her the book title, but she doesn't know any knitters who could tackle mittens in two colours. Pity.

Actually, if you're a knitter who would like to try out two-colour knitting for the first time, I'd recommend mittens. They're small and it's easy to find patterns that can be committed to memory easily. The Zilboorg book has clear instructions and lots of variety, and is as good a place to start as any.

wardrobe stuff by Katherine Hajer

I have this bad habit of knack for wearing out the left elbow on my jackets. Not just knitted ones — store-bought blazer-type ones too. Not only do I get to be annoyed by having a jacket that is perfectly wearable except for the one elbow ruining it, but I get to have insult added to injury when various people tell me to get those suede patches that everyone loved to hate in the 70s.

Right. Because suede patches look so incredibly good on tailored suit jackets

Instead, I've been busy making up some knitted jackets. Not cardigans, exactly, although technically I suppose they are. "Cardigan" implies something casual. These are office-ready, and have some dressmaker details to make them more tailored-looking.

The first one I finished is a Fiona Ellis pattern:
It's a basic shaped jacket, with just a little two-colour work as trim. I made two changes from the original design. The first change was to add hems to the bottom of all the body pieces. The original pattern just called for a few rows of the contrast colour in garter stitch, and it was doing absolutely nothing to keep the edges from curling, so I had to rework.

The second change was to omit the floppy pleated cuffs and replace them with a plain hem that had the same trim as the front and neck bands. I thought the dramatic cuffs were great, but not terribly practical for the office. I have to type a lot for my day job, and worried I would have to do a Liberace-style wrist flourish every time I went to edit a new version of a requirements document.

The second jacket is from a recent issue of Interweave Knits:
This one had a lot more mods to the original pattern.

  • I added extra rows of garter stitch to the bottom of the body and sleeves to keep the lace edging from curling. It still does, a little bit. The directions said steaming would get rid of this. I am not inclined to steam a jacket every time I want to wear it, so decided to let the knitting do the work.
  • I added a 5-stitch garter stitch border at the fronts of the body's lace edging so the edges wouldn't curl in. The original pattern called for the knitter to flip back X number of stitches and tack them down to the wrong side. "X" didn't equal a pattern repeat or half-repeat, so the lace on the back of the facing wouldn't have lined up with the front of the facing. I had to re-jig the stitch counts a little, but was pleased with the garter stitch.
  • The stranded colourwork (the stylised plants around the body) were worked in the round with a steek up the middle, because purling back through a 25-st repeat with no symmetry in it did not appeal.
  • I worked the colourwork chart so that only whole motifs were knitted in, instead of partial motifs per the instructions. I figured since I was creating the fabric instead of working with printed & cut stuff, I could pull off little niceties like that.
  • Because of the steek, I changed the way the front facings were worked from the original directions.
  • I added some rows of I-cord and I-cord knot buttons with loops to close the fronts. The original pattern had a single hook-and-eye closure just below the collar.
  • I made the sleeves full-length, instead of the original 3/4 length. If I'm wearing a 100% wool jacket, I want to stay warm. Also, 3/4 sleeves look ridiculous on me.
I don't think the alterations on either of these were any big deal — having it "your way" is a big motivator in DIY. Even with all the mods to the purple jacket, I only needed one sticky note to track all the numbers, and it's still perfectly recognisable as a rendition of the original jacket in the magazine.

What are your favourite DIY wardrobe tricks?

thinking too much by Katherine Hajer

I finished these socks recently:


The pattern is from Cookie A.'s Sock Innovations. They were dead easy to knit, and I like how the ribbing, diagonal lace panel, and plain stocking stitches work together to warp the self-striping when the socks are worn. Which is just as well, because I've tried no fewer than five different patterns on this yarn and hated the knitting, or the results, or both, for all of them except for this last (sixth) attempt. This yarn was The Yarn That Didn't Want to Be Anything for over five years. It probably doesn't help that the stripe colours and the background colour remind me of sweat socks from the mid-70s.

If the socks were over-thinking materials with pattern, this bath mat had me over-thinking the execution:


The pattern is the Doris Daymat from The Happy Hooker book. I've been wanting to make this as a bath mat for years, but could never wrap my head around estimating the yarn quantities for a finer gauge and a different mat size. I finally had a "duh" moment, found a baby blanket estimate in Ann Budd's handy crochet brochure, and everything worked out swimmingly. (Okay, except for the edge distortion you can see in the photo, but I'm trying to pitch that to myself as "whimsy" because I can't bear the thought of taking it out and doing it over with fewer stitches on the short edges.) I already have another one on the go. Incidentally, the flowers can be detached and reattached easily for those times when less funky decor is required.

Lesson learned: don't make things so complicated that execution paralysis sets in. When in doubt, try it out.

catching up by Katherine Hajer

Between writing a lot and reading some-but-not-enough, I've actually been making a lot of things. We did just finish harvest season in Toronto, after all. I made freezer jam for the first time (no photos — spent too much time covered in peach pulp for that, but the jam tastes great so it was worth it!). I also froze bags of tomato puree.

First you pour boiling water over tomatoes while they're sitting in a sink:

(Note: I'd already done a few batches by the time I took the photo. That's why there are free-floating tomato bits in the water. Don't be disgusted; the sink was scrubbed very clean before I started.)

Let the tomatoes sit for a bit, then fish them out one by one with a slotted spoon, core them, and peel them. The skin should slip right off once you core them, but if you have to give it a little help with the paring knife, that's cool too.

Once they're peeled, the tomatoes can go into a bowl:

And once the bowl is about as full as it is in the photo, take a stick blender to the tomatoes until they are nice and liquefied.Ladle into freezer bags, seal carefully, and place on the freezer shelf until they are sufficiently bricklike to store stacked. Let thaw in the bag, in a bowl in case of leaks, in the fridge for around 24 hours. This stuff is great for making pasta sauce, soups, and stews.

It took me the length of a long CD (say 70 minutes) to puree and freeze two baskets' worth of tomatoes. Some would argue that's a lot of work, but since I was going to listen to the CD anyhow, it didn't seem like it.

I've been doing a bunch of other stuff too, some textile, some jewelry, and some more "putting up" for the winter, but that can be another blog post. There's a lot to do...

how to save $30 without even a sale on by Katherine Hajer

I have a storage unit in my bedroom that sits under the windowsill. Its purpose in life is to hold yarn until I finally get my yarn stash down to reasonable levels. Then it will be stood on its end and repurposed to hold books.

In its current working conditions, it gathers a lot of dust, so I had the brilliant idea to buy a table runner to cover it up. I would much rather wash something in the laundry every once in a while than dust it every week.

So I popped down to a home decor place in my neighbourhood that shall remain nameless, and was completely sticker shocked by the prices on table runners. They went for $50 or more.

Then I noticed one of those Grossly Unfair Price Things: while the table runner I wanted was about $50, the matching napkins that went with it were only $4 apiece. I bought four, ran home giggling to myself, and threw them in the washer and dryer.

They came out wrinkly but not ruined, so I ran them over with an iron. I thought of a few ways to connect them together, but decided on a no-sew method: I just picked seven colours from my embroidery floss stash and tied them together at regular intervals, using the plaid pattern as a guide:
I had some fun staggering the floss colours on each subsequent joining, but otherwise didn't fuss too much. Three joins and twenty-one bows later, I was done:

The floss came from one of those big mixed bags of colours they sell for $20 or so. I used maybe $2 of floss, so the whole thing came to about $18. The napkin table runner is the perfect length and depth, with just a little bit of overhang on all the edges. It's actually more functional than the prefab runner back at the shop, which was narrower and would have left me with a thin strip of exposed laminate to dust (and what's the point of that?).

I know that if I'd done some fabric shopping I could have saved even more money, but there aren't any fabric shops near me and this plaid did match my bedroom decor exactly.

Had any thrifty success stories lately? Let me know in the comments!

baby steps by Katherine Hajer

I am not as charitable towards timid knitters as I ought to be. Not becase I think they are allowed to be timid — I can't think of anything less intimidating than looping yarn — but because that makes me a hypocrite.

I am a phobic sewer. It's not the sewing so much as the stuff that comes up front: the cutting. Cutting terrifies me because once the fabric is cut, it's cut. If you cut too big, you're still maybe able to fix it, but if you cut the piece too small, the best you can do is think of something else to make.

So, I was very pleased with myself when I managed to sew a floor cushion using instructions I got at Apartment Therapy. The photos helped a lot, there was only one cut to make, and it seems I guesstimated the seam allowances correctly (the pattern is so stupidly easy they didn't bother specifying them). Try this next time you have two old bed pillows handy and feel like getting a quick project done.


I needed to chop about 3" off the end of fabric to make it the right size. It's just a straight edge, but it's also the first time I've cut this much fabric without making a slant or jaggy edges.
The directions called for slicing part of the pillows into strips and tying the strips together. My pillows were filled with little chips of foam, so that wasn't going to work. Instead I shook all the stuffing to one side and sewed them together, sort of a pillow version of a mad doctor's experiment with hybrid lifeforms.

Two of the corners had mock box shaping. I actually managed to achieve this!

Here's the finished pillow, complete with velcro-ish closure sewn in. The cover seems a bit big, but I guess that leaves "squish room" for when people sit on it.

happiness really is a warm gun by Katherine Hajer

I'm on the record for hating what I call "white glue crafts." You know, you buy a kit with all these pre-cut, pre-fab pieces, and then you stick them together, and then you get to tell people you made it. But you didn't; you just assembled it.

Therefore, it's taken me a long time to come to terms with the idea that you can be creative and use glue at the same time. Glue for practical purposes, sure! I have at least three different kinds on the "interesting chemicals" shelf in the laundry room, right next to the itty bitty pots of house paint and the WD-40. But glue to make stuff with...

I broke down a little when I wrecked my old coffee table's surface and re-covered it with decoupaged Ansel Adams photos from an old calendar. Then I made the DIY souvenir van Gogh coasters by, um, appropriating the materials from a kit J-A had given me and basically throwing out the instructions.

Then I made the book purse that Jake sent me the instructions link to. Making that necessitated buying a glue gun.

I now understand why people get so enthused about glue guns.

After I was done the purse, it occurred to me that I still had twenty-two glue sticks left (would have been more, but as a novice gun-slinger I had to re-do parts of the purse). The first thing I did was fix the Elizabethan blackwork embroidery I have hanging over the entranceway to my kitchen, so that it doesn't sag anymore:

(Hey, it is Elizabethan blackwork... just modernised from Subversive Cross-Stitch. You were expecting?)

It used to be that this piece's top flap had pulled away almost completely from the backing. It's been weeks now, and it's still nice and snug. Yes, I know I didn't centre it properly, but that's not the glue's fault.

Then I took some heavy-duty clear plastic, added hot glue to it, and patched over the two ripped holes in my shower curtain (because I haven't found a red poppy curtain to replace it with yet). I used a one-hole hole puncher to punch new grommits in the curtain, and the results look like this:
You can tell, but you can't tell a lot, and it looks better than having the first foot of the shower curtain off the rings.

Having accomplished these wonders of home decor repair, I unplugged the glue gun and let it cool down. That was a couple of weeks ago, and everything is still holding up wonderfully, including the book purse.

I discovered recently, however, that the circuit board earrings I made a long time ago are not in good shape. One of them has come completely off its earring findings.

Might be time to pack some heat and ride out into the DIY repair sunset again...

it's august. fuck. by Katherine Hajer

Today is the first day of the second half of summer for people in the Northern Hemisphere. It's all shorter days and end of the growing season from here, folks.

[ducks as rotten fruit and verbal abuse get thrown]

Still here? Don't blame me — get angry at the Earth's orbit or move to New Zealand or something. I'm just pointing out the obvious.

The obvious, if you're a knitter, is that all those lovely sweater-weather sweaters you want to wear this fall aren't going to make themselves. So if you want at least one new jacket to wear this fall, you're going to have to find some air conditioning and get started on it now.

That's precisely what I did this morning. I agonised a little (and still am, a little) over finishing some stuff that's been on the needles for an embarrassing amount of time, but in the end I decided to grab some stash and start Sway by Fiona Ellis (it's in her Inspired Fair Isle Knits book). The original is in a lilac grey with pink trim; me being me, I'm making mine in brick red with black trim, and have decided to make some modifications. If I ever get the thing done, I'll be posting photos here. Wish me luck.

The other "September is less than five weeks away" crisis I'm going through is that I started cleaning out my bedroom closet this weekend, and I discovered that moths had eaten five pairs of my hand-knit socks, plus three skeins of sock yarn that I was keeping in the same closet. That explains why, as of Friday night, I had three new pairs of socks on the go and plans for several more. I'm all for tossing stuff I don't want anymore, but I'd like it to be me that decides what goes, not a bunch of stupid fibre-eating insects.

(By the bye, in case you are smugly patting yourself on the back because you only buy cotton and synthetics, I have some bad news for you: I have had moths eat 100% acrylic gloves with plastic palm grips. They are evil vermin right up there with raccoons.)

Two of the socks on the needles are from Cookie A.'s Sock Innovation book. The last one is a free download from Knitty, but by the same designer. I like how this woman thinks. Her suggestions for resizing the patterns are reasonable and treat the reader like a grown-up.

I find my knitting goes through phases. I don't just mean in terms of colour, technique, and output, although that happens too. Right now I'm in high production gear because I need the clothes. I like to wear jacket-y cardigans to work because actual jackets are too uncomfortable when I'm going to be sitting in a cubicle all day. Last winter, though, I wore the left elbow out on no fewer than three cardigans, leaving me with just one that I could wear (I have a bad habit of propping my head up on my left hand when I'm reading, in case you're wondering how I managed that). So it's time for more jackets, even though I also need to get the first draft of my novel done. I have enough stash for [glances around the living room] three more plain coloured ones, plus one or two that are already on the needles. There is one that I bought the pattern for and would like to make in a colour I don't have in stash. Maybe that can be this fall's yarn purchase. Yeah, I know. But hey, it's mostly stash-busting!

And, thanks to the moths, it's also time for more socks, and that can definitely be 100% stash-busting. To be honest, a lot of those socks were near to worn-out anyhow, so the critters just sped up the process a little. Not that I'll be forgiving them any time soon.

two favourites in one by Katherine Hajer

Early this past spring the ever-blogworthy Jake sent me this Remodelaholic link for how to make a book bag. That's a purse made from a book, as opposed to a bag made to carry around books. I've been looking at versions of these at various art and crafts shows for ages, so the instructions for how to make my own were like being handed the question for life, the universe, and everything.

Since then, I've been collecting all the odds and ends required to make the bag. I even caved in and bought my own glue gun (more on the immediate mischief that caused around the apartment in a later post). I also found some variations on the instructions on other sites, like this Country Living version, but in the end I stuck pretty close to Remodelaholic's version. It seemed the most structurally sound and usable.

Last weekend I was finally ready. The fabric was washed and ironed, the pages were cut out of the Canadian Oxford Dictionary I'd selected for sacrifice (common enough not to be a heavy loss, but pointedly an Oxford dictionary, not one of those Webster-wannabes), and the glue gun was warmed up. Here's how it all went down:

Here's the book cover after the pages have been cut from it. At this point, the spine is fairly fragile, since it was designed to be flexible when the book was being used. This was the part where I took all the measurements I'd need later to cut the fabric to size.

I followed Remodelaholic's lead and reinforced the spine with duct tape. Fortunately, I had white duct tape handy, because the lining fabric I'd chosen was a print with a white background. The duct tape reinforces the spine and makes it sturdy enough to be the bottom of a bag. I added a second, lengthwise layer after I took this shot.
Some instructions say to glue-gun the handle ribbons in place; others say use duct tape. I did both.
After that, it was a case of measuring, cutting, and pressing the fabric, then gluing the pieces into place. I am a glue-gun newbie, so I wound up having to re-do some steps and didn't do as neat a job as I'm used to managing in other media. Things still turned out presentable enough, though, and I got away with only light first-degree burns to my left index finger.

Next time (I've already decided there will be a next time) I'm going to use a bigger book. The spine on this book was about the minimum width I'd want to contemplate for a purse — it just fits my wallet  — but the length and depth could be greater, or else the purse handles could be smaller. Even still, I'm pretty happy with it, and will definitely be using it!

except do it on purpose by Katherine Hajer

Regular readers of the DIY Eyrea will know that I'm not much one for knitting fads — and, given that the craft dates back 800-1,000 years, I count a "fad" as anything less than a century old.

By that count, felting (I am not going to call if "fulling" outside of a textile studies programme) via washing machine is most definitely a fad. Felting knitted stuff itself dates back to the first time someone pulled a shrunken, matted piece of work out of the laundry tub and thought to themselves, "You know, if I planned for that before the knitting that could be kind of useful fabric..." Felting by machine, of course, only dates back to since the invention of washing machines. Until the fad, most felting by machine was unintentional.

The Naked Sheep recently got some felted clog-style slipper kits in, and they interested me because slippers are one of the few things I feel justify felting these days. Unless you are a Dutch fisherman, you probably will never need a felted sweater. Felted bags? Meh. Depends on the bag design. Felted slippers, on the other hand, are both warm and hard-wearing. The first is probably less important in these days of central heating, but hard-wearing still counts.

I'd just finished the ballerina slippers from the mercerised wool Gina gave me (see previous post), but felted slippers sounded interesting from a longevity point of view. Knit them once, quickly, on big needles, felt them, and then enjoy them for a long, long time. It sounded like a great return on investment. So I headed down to the Sheep, checked out the kits they still had left, and came home with a purple/blue/burgundy/turquoise blend.

The slippers looked like this initially:

They were almost twice as big as they needed to be. Since I had never caused serious shrinkage to anything woolen in my life, I was very nervous that I would wind up ripping out the things and making more ballerina slippers with them, but followed the instructions with the pattern and dutifully tossed them in the washing machine.

Three and a half hours later, they were this size:

In the photo, it looks like the slippers are still way too big, but when I put them on, they're only a little too big. In other words, they feel like clogs.

I hope these really do last a long time. The felting took more time than the knitting, and it got excruciating after a while having to stop the washer every five minutes to check on the progress. If someone were going to make an entire family's worth of these things, I strongly recommend felting them all in one go. My washer survived the ordeal pretty well, but I'm much more likely to believe those stories about burning out the washer motor while felting now.

Pattern notes: this is a Fibre Trends pattern and assumes you will want to knit in the round. Because most of the slipper is worked in short rows, however, it made more sense to me to convert the whole thing to flat knitting. This only adds 12 rows of seaming to the slipper, and since there are already two sole seams to stitch up, it doesn't seem like that big a deal.

finally by Katherine Hajer

Sometimes you tell the yarn what to be, and sometimes the yarn tells you what it wants to be.

Once upon a time, the ever-cool Gina came to visit TO from Alberta. Being the ever-cool person that she is, she brought hostess gifts with her, and I put a picture of mine on this blog, like so:


Check out that gorgeous blue-green yarn. That colour combo has since become the main colour scheme for the entire on-line part of The Eyrea. I don't know if it came directly from the yarn — more likely, it came from something Gina said that I can never quite remember — but this is definitely the first instance of it showing up in tangible form.

The reason why the yarn came in one big skein of green-blue with two smaller skeins of blue-green is because you're supposed to make socks from it. It's a fine worsted weight, though, and I'm not big on thick socks for all the usual reasons — they don't fit in boots, they look chunky, blah blah blah. At first, I thought I'd make mittens with contrast cuffs or in a colour pattern. The yarn is mercerised wool (very strong stuff, but still soft to touch), so it would make a nice pair of hard-wearing mittens. I even started a cuff, but somehow they never got done.

Then, over the summer, moths ate the first pair of handmade slippers I'd knitted for myself in years. This time, I decided to try the slipper pattern in the most recent Interweave Holiday issue, since it still had that ballerina slipper shape I like and, most importantly, had instructions for my size.

They were a quick and easy knit, but I found the top edge was a little too big to get them to stay on my feet (this may be a quirk of my feet, my knitting, or the pattern — not sure). So I headed over to Mokuba, picked up some grosgrain ribbon that happened to come in the exact same colours as are in the yarn, and threaded it around the edge so I could adjust the opening:
With the addition of the ribbon, the slippers are dead comfy. I've worn them enough that there should be some "fuzzing" on the soles, but the mercerised wool is holding up very well and shows no signs of wear. It went flat on the sole, but doesn't look like it's fuzzing or pilling anywhere.

Of course, since the original amount of yarn was intended for socks, I have a lot left over. The next time I feel like knitting up some of these slippers, I'm thinking of making one with green-blue yarn and blue-green trim, and the other in the reverse colour scheme — sort of a medieval thing. It'll look fun, and they only get worn at home or in the homes of friends and family, after all.

vegan Barbie-doll pink by Katherine Hajer

This summer I decided I wanted to experiment a little with chilled soups. I love soup in the winter (one pot meal + filling + healthy = good), but the only summer soup I made was gazpacho, and as wonderful as gazpacho can be, it does get boring after a while.

Since I also love beets, I decided to try this chilled beetroot soup. It's dead easy, and goes something like this:
  • Steam 3 medium-sized beets until just cooked.
  • Gently cook chopped potatos and onions (to match the volume of beets) in butter or vegan margarine, taking care nothing browns.
  • Peel and chop the beets and add to the potato-onion mixture.
  • Add 1 litre water or stock to the vegetables. Let everything cook through for about 15 minutes.
  • Purée it all (I use a stick blender right in the pot) and let chill, or eat warm if you prefer.
Basic enough, right? Here's the best part: this tasty, vegan-friendly (if you use the margarine instead of butter), relatively healthy soup made with very basic ingredients comes out looking, all on its own, like this:

That's an all-natural colour that has not been 'Shopped, folks.

Bonus fun: bring it to work and have colleagues ask you if it's your dessert.

if you're reading this, you may already be a hippy by Katherine Hajer

To those who read both my blogs (hi Carla!): this one is getting cross-posted because it overlaps the topic scope for both of them.

The meanings of words shift all the time. This is not necessarily a bad thing, but it can be annoying if you enjoyed using a word in its previous sense and now can’t. I know of one grandmother who got pretty upset when her grandson’s parents told her she could not teach her grandson to call a cat by saying, “Here, pussy pussy.” You understand.

Things float the other way, too. Things that had one label stamped on them can have an entirely different one stamped on them once the previous one fades. This can be good, bad, or indifferent, but it can be very annoying if the new label doesn’t quite describe the original thing as well as the old label did. Perceptions change, practices change, and eventually the thing itself is in danger of changing.

One word that illustrates this is hippy.

Hippy comes from “hip,” as in “with it.” It grew to encompass a lot of things — do some Google searches if no ready stereotypes come to mind. It also grew to encompass a lot of things that pre-date its inception as a word.

There’s a nice point in a Philip K. Dick short story (whose title I am too lazy to look up) where one character assumes another is a hippy because he has a beard. The third character who has introduced them later explains that the “hippy” is actually a conservative — he has a beard because he has a nasty case of barber’s rash.

Hippy-ism (hippiness?) spread over all sorts of things that became associated with it, whether they were exclusively for hippies or not. Things like pacifism, or home schooling, or growing your own food, or doing things by hand. People forget that there were conscientious objectors in both world wars, that community schools are a relatively new innovation, that the working classes/peasants always grew their own food whether they were “farmers” or not, that doing things by hand was once a sign of thrift and quality products rather than a sign of “dropping out.”

When people ask about my parents and/or my childhood, they often comment that my family must be hippies. We had two big vegetable patches and a small orchard, and lived in a house my dad and his brother built. My mum sewed a lot of the clothes I wore. My brothers and I had wooden toys our grandfather made us. And yeah, politically we often (but not always) wind up on the pacifists’ side.

A quick glance at some family photos, plus some extra contextual information, shows how wrong that perception is. My mum worked at an office and was (still is) a twinset-with-pearls type. My dad was a fan of Elvis and the Rat Pack. Besides, long hair can get in the way when you work in construction. The garden? The sewing? The wooden toys? Both my parents were avid gardeners who didn’t have a lot of money when I was a kid — growing veggies was fun and practical. Same thing with my mum and her sewing. And of course my grandfather made us wooden toys — he was professionally trained as a finishing carpenter and worked as one almost his entire career. The pacifism isn’t exactly unusual in people who grew up in countries that have been occupied during wartime, and both sides of my family experienced that.

Over here in North America, safe insulated attacked-twice-in-100-years-but-not-invaded North America, all those things, those activities, add up to being a hippy, at least for those who don’t know any better. An entire ethic of thrift, practicality, and simple do-it-yourself-ness has been buried under a catchword.

It goes further than that. Are you a woman who doesn’t remove her leg hair, pit hair, or (ahem) hair in other places? Get ready to be called a granola-cruncher, even if (like the character in the PK Dick story with the barber’s rash) it’s because you have sensitive skin. Actually, with the hysteria aimed at those with pubic hair these days, it might be something worse than “granola-cruncher” if you happen to be wearing a bathing suit at the time.

What if you make an effort to eat less processed food, or if you like making basics for yourself like bread, jam, or soup stock?

What if you prefer to make your own music (or listen to your friends make some) instead of buying whatever is at the top of the list on iTunes this week?

It seems to me that it doesn’t take much these days to be a nonconformist. The weird thing is that there are an awful lot of people being nonconformist in these things, or myriad other things.
So are we all hippies now? Or is it time to do a collective semantic readjustment and admit that the label is not only inadequate and misleading, but also passé?

white glue stuff (aka DIY souvenirs) by Katherine Hajer

Nearly two years ago, the ever-innovative J-A gave me a housewarming present for my (then) new apartment. It was a kit to transfer copies of photos or other graphics onto little tiles of champagne-coloured marble and make coasters out of them. Since I was in the throes of moving house at the time, I stuck the kit on the top shelf of my front-hall closet.

It sat there until this spring, when I pulled it down and read the instructions. Some of the process sounded like what I had done to my old coffee table when I ruined the surface (long story) — I cut up bits of an old Ansel Adams calendar a co-worker gave me and collaged the whole thing, then sprayed it with several coats of varethane. Here's an old photo that shows the table top:


I'm not big on what I call "white glue crafts" — anything that involves sticking bits of things together with white glue purely for decorative effect. But, as the refinished coffee table shows, even white glue can be used to fix things so that they're not only useful, but look good.

The coasters are useful too, of course. I wasn't too keen on getting photos laser printed on special paper at a printing services place, though, especially when the kit came with a special list explaining to the printer that although the supplied (and required) paper was plastic-coated, it wouldn't melt in the (required) colour laser printer.

That sounded like too much negotiation to make four coasters.

Then I went to Amsterdam on vacation. At the van Gogh Museum gift shop I found a pack of serviettes printed with one of my favourite van Gogh paintings — his Butterflies and Poppies still life. It seemed to me that serviette paper should be thin enough to glue well to the marble, and usually serviettes are printed so that the ink doesn't run easily (they wouldn't work well as serviettes otherwise).

It worked! Each serviette had two layers: a printed layer and a plain white layer. I separated the layers and just glued the printed one in place, then kept adding thin applications of glue/glaze until I ran out. Then I added the little cork feet that were included in the kit. The results look like this:

I love how they turned out, and I'm sure they'll be very useful.

As always, I have to wonder with a kit like this how easy it would be to just collect the materials yourself and make your own. Certainly cork pads are cheap and easy to find, as is white glue (and water to thin it with), foam brushes, and cheesecloth to wipe away excess glue. The little square of sandpaper came in handy too, so add that in to the list.

That leaves the marble squares themselves. From their size and thickness, I'd guess that these were originally destined to be part of a wall or floor, but they have irregular edges and some badly damaged corners. For coasters, that adds a little design element, but I can understand not wanting to grout them. If they can be had (and had by the each or in small quantities, with no mesh backing), then I can see making more of these.

it is done. by Katherine Hajer

Some things you start, you work on them, and then they're done. Short stories often work that way for me. Small knitted items do too, as well as some double-strand necklace patterns.

The above beaded collar was my first foray into beaded netting, and it did not go quickly. It's been on the thread since before I got my first beading board, so it's been over a year and a half. Although it's a three-colour pattern (hard to see in the photo, sorry, but this was the pick of a bad lot), the netting itself wasn't difficult. The hard part was wrangling the thread. It seemed like the stuff was always either tangling on itself or breaking on the blue beads. I guess they have sharp edges, but it did get frustrating.

Now that it's finally done, the collar is a little shorter than my usual (although it does measure the regular length on a beading board). It's meant to be almost choker-style, so that's all right. It definitely fits comfortably.

The pattern was a freebie from Interweave if you're interested, from (who else?) Rypan Designs. I used the same colours as the necklace in the pattern, but used one size smaller beads.

reverse engineering baked goods by Katherine Hajer

I seem to be on a kick involving making home-made versions of traditional prefab British food products. Previously, it was baked beans. At least those make a sort of sense, because they really are better than the tinned baked beans domestic to Canada, but the British Heinz ones, although available here, are too expensive (for me) to justify spending on, you know, baked beans.

Then I read the recent Guardian article about Soreen. I'd never heard of the stuff before, but anything packaged that's been around since 1938 and that people love so much is worth checking out, I figure. Besides, it supposedly has malt in it, and Malties/Shreddies were my favourite breakfast cereal when I was a kid.

This time, the local British candy/grocery store (90% candy, 10% imported groceries) failed me. No Soreen. Luckily, some of the commenters on the Guardian story had mentioned that their mums or grandmums had made home-baked versions, so I was able to dig up a recipe to try.


The results were crunchy on the outside, chewy on the inside. It tastes nice, so long as you like a dark sugar flavour, but somehow isn't super-sweet (probably because I am always stingy about sugar). It does taste good with butter on it — it needs it, because the only fat in it is from milk. I can't imagine throwing a slice of this version in the toaster like people do with actual Soreen though. It would probably do a milder version of the Strawberry Pop-Tart Blow Torches (a classic web page if there ever was one, dating from August 1994!).

I think the next time I try this recipe I'm going to experiment with adding slightly (but only slightly) more milk. And maybe whole milk instead of the 1% I happened to have on hand. Prefab stuff this simple can be delicate.