creative challenge-type stuff by Katherine Hajer

I've been going through another period where there's lots of things I would like to start, but even more things I would like to finish. One of the things I would like to finish is de-cluttering my apartment, and if I'm going to do that, I have to be able to put away most of my beading trays.

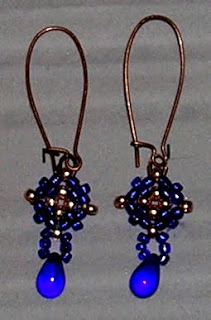
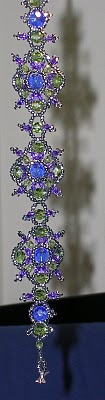
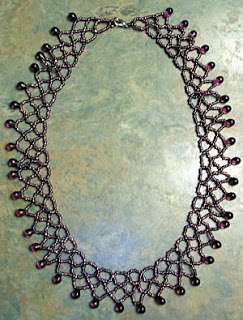
The finishing of the necklace in the photograph to the right marks the clearing of yet another tray. As an added bonus, the only non-stash elements in it are the two large silver beads and the clasp.

There were two challenges with this piece: first of all, most of the beads are shades of pink. I hate pink. I hate pink so much that I was considering just tossing the beads (they'd been acquired through gifts anyhow), but then the ever-stylish J-A pointed out she liked pink, and if I wanted to experiment she'd be willing to receive the results.

The other problem was that the pink beads were all around a size 6, but not ever evenly produced. Almost all of my beading is done with size 11s, with some faceted beads and drops thrown in. J-A likes chunky styles in necklaces, but these beads weren't chunky enough.

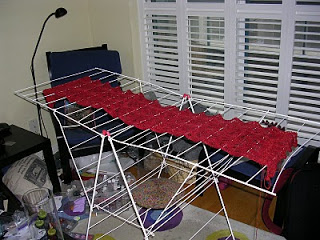
I really do hate pink, but I am currently knitting a jacket with lots of pink in it. It's Kaffe Fassett's Red Diamonds pattern, and the trick with that particular stash reduction attempt is to choose yarns that sort of talk around red. I have pinks, plums, roses, maroons, and all sorts of colours that are close to a true red without actually getting there. I have lots of reds and scarlets and crimsons too, but the point is that because they're all thrown in together, all of a sudden pink has a place in the spectrum. If it wasn't there, the colours in the jacket would be too strong and strident.

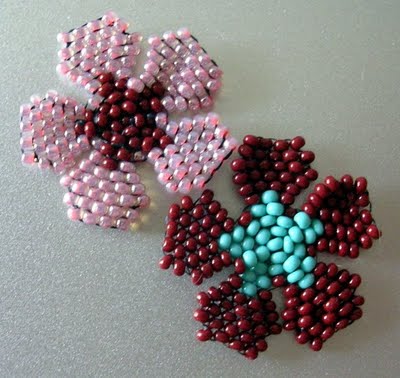
Fassett has a much more elegant way of putting it, but I call this the principle of "sucky colours working if you put enough of them together." I tried the same thing with the beads, making the peyote-stitch tube that forms the centre part of the necklace first. I just worked it until I ran out of the anthracite beads. The tube has relatively little flex in it — the curve you see in the photo is about the maximum. Fortunately, its own weight encourages it to curve to the maximum when it is worn.

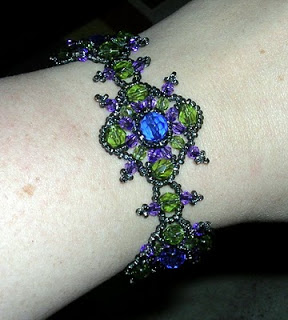
Then I worked the two herringbone bands out of what was left of the pink beads. They're just this side of being tubular — four beads around. The herringbone tubes are very flexible, which I tried to show in the photo.

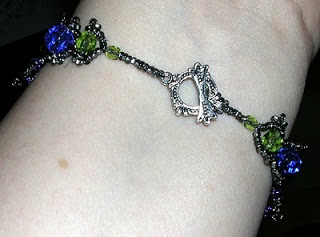
After that it was just a case of attaching everything. I didn't find any large-size bead caps I liked, so I got the big silver beads instead and just gathered the ends of the beaded tubes as tightly as I could. It works. I did put some small bead caps on the tops of the herringbone tubes to help centre and attach the clasp.

Overall I think it works. This is the first piece I've done entirely on my own, from scratch, without a pattern or photo to give me an idea. Beaders tend to come up with cutesy names for their work — beading magazines even seem to encourage it — so I'm coming up with a name for this one. I'm calling it "Ethnically Confused." It has elements that can be found in the beading traditions of Africa, Eastern Europe, Central America, and Asia, yet the colours are straight out of a North American shopping mall. If I'd done it in turquoise and coral, or ebony and tiger-eye, I'm sure J-A would have had people who don't know any better asking about where it was from every time she wore it. Instead, she gets to have something that does not scream hand-made either from the "a friend of mine made this for me" standpoint, or the "some women making appalling low wages in a faraway country made this" standpoint. I'm not even sure it's not ugly, but people can make of it what they will.

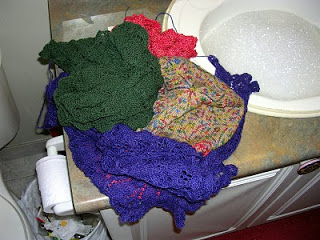
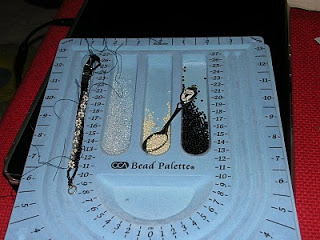
As for stash-busting, you can see from what's left in the tray that I still have lots of pink beads, although not nearly as many as I started with. A lot of what's left are odd sizes or don't have properly reamed holes, so I think I'm going to only keep the cherry-red ones and the petrol ones (lower left corner on the inside and outside dish groups, respectively). The rest can go in the garbage. I made my creative challenge and I'm happy with it — time to move on to other things.

reverse engineering food by Katherine Hajer

Once upon a time, when the World Wide Web was but a glimmer in Tim Berner-Lee's eye, the Toronto Star used to run a regular column where readers could write in and request the recipes for dishes they'd had in restaurants. A Star staffer would get the recipe from the chef in question, and then write it up along with an interview with the chef, a description of where the restaurant was and what else they had to offer on the menu, and a quote from the request letter, typically gushing about how great the dish in question was. For the price of one recipe (usually one of the more basic ones, at that — dishes that required an actual professional kitchen tended to be avoided), the chef and the restaurant got some very nice publicity.

These days, we do have the internet, and apparently there's a sizable army of people out there willing to research, reverse engineer, and otherwise discover the secrets of popular restaurant and prepared-food recipes. Once they do find out, they post the results on blogs, foodie sites, and anywhere else that seems appropriate, even in e-mail chain letters.

Once, the recipe-hunters may have been motivated by questions such as, "How do I make this at home so I don't have to trek all the way to Restaurant X?" or "How can I save some money by buying the ingredients myself?" Now, one is just as likely to find recipes motivated by sentiments like, "I love this, but I want to control the portion size/make it less fattening" or "I want to make this without the scary-sounding chemicals included."

Recently I've been reading about how the lining material used in food cans in North America can chemicaly react with certain foods, causing chemicals in the lining material to leach into the food. Baked beans are supposedly one of the worst culprits for this, which dismayed me, because I eat baked beans throughout autumn, winter, and spring. Around the same time that I started hearing about this, I decided to get some cans of Heinz baked beans from the local British grocery. They cost twice as much as domestic cans of beans, but all my British friends insist they taste better, and the article on scary chemicals from tinned foods said that the EU had different, safer standards on canned food linings.

From eating my way through the four-pack of Heinz beans, I learned two things:
  1. My British friends were completely right.
  2. Given (1) above, I was going to have to learn to approximate this recipe.
It took three batches of slow-cooked beans, but I finally have a decent version. They're not the same as Heinz, but they're a lot closer to, and no tin cans are involved.

Ingredients
3 cups of cooked navy beans
about 3/4 c Heinz ketchup (Heinz ketchup = Heinz-ish beans)
about 1 tbl Dijon mustard
a few drops of Worcestershire sauce

Method
Place beans in slow cooker. Add all of the other ingredients to a measuring cup, then add enough hot water to make up about 1 3/4 c total. Stir until combined. Pour over beans and cook on Low setting for 4-6 hours.

This makes a version that has the right flavour, but a strong vinegar smell. Next time I may reduce the ketchup a little and up the water a little (the consistency of the sauce is also a bit thicker than the authentic Heinz British beans, so this makes sense to me).

Did you notice there is absolutely no added sugar in this version? No brown sugar, no maple syrup, no molasses. No wonder I like it so much.

What's your favourite way to do beans?

tension by Katherine Hajer

Sometimes I think every time a needle is involved in a craft, the whole thing becomes all about tension. The artisan has to know when to pull tight, when to pull tighter... and when to slack off.

It’s definitely true in knitting and crochet. I once knew a knitter who knitted so loosely that she could get stitches on 3mm needles — 3mm! — that were the same size as I would make on 6mm needles. She tried knitting a baby sweater as a shower gift for a friend. Her mother-in-law, a master knitter, finally had to hold up the sweater to her own body and show that it was too big for her, never mind a little baby, before my friend was ready to admit that maybe she should learn to tighten up a little.

Then there are the knitters and crocheters I’ve met who seem to think they’re engaged in knot-making, rather than loop-making. I’ve always wondered how they ever get more than one row done.

The secret, it seems to me, is to work with the materials, not against them. Yarn and thread do not have a will of their own. That means that they cannot be allowed to run all over the place as their structure would allow them. It also means they don’t have to be beaten into submission. The artisan guides, and only has to push until the materials fall into place. Once they do, the artisan has to back off and let them be.

I am starting to appreciate how especially important this is with beading, where you can have a mix of wildly different tensions in a single piece. I just finished this necklace (another Rypan kit) for the ever-stylish J-A. She bought it to make herself, then took one look at her cat when she got home and realised she could never leave half-finished beading and him together in the same space. So I said I’d do it so long as I got to keep the needles and leftover materials, and she readily agreed.

The chain on this necklace is a diagonal stitch I’ve never seen before. The pattern warned that it can be sloopy at first (look at the chain to the left of the clasp and you’ll see what they meant), but once you get going it makes a beautiful, supple, and perfectly flat set of links. If I’d had more practice with it I’m sure I could have fixed the first part. The trick is, and again the Rypan pattern is specific about this, that you have to pull tightly, more tightly than one would think one could get away with in a stitch like this. The truth is, though, that the beads just don’t sit right until they’re firmly told where they need to go.

The swags were the opposite. Here, the trick was to keep a looser than normal tension, because swags that are pulled tight don’t hang and flow nicely. I used gravity, letting the beads fall along the thread until they met up with the last-stitched bead, to make sure there were no gaps, and then stitched. It was only when I had gone around the right-angle-weave posts (the larger, vertical strips of beads between the swags) once that I pulled tightly.

Really, the importance of tension shows the benefits of knowing how to do multiple types of needlework. Anyone who’s done crewel embroidery, or knitting, or tatting, or any number of other ways of manipulating stringy bits will recognise what needs to be done for the finished work to be successful.

much better by Katherine Hajer

In retrospect this was an incredibly stupid thing to do when I was coming off a bout of stomach flu, but I'm glad that the washroom is repainted, and in a colour I like too:


It took two quarts of the new colour to fix the one quart of painting disaster I blogged about last time. Thanks to the bit of mirror I managed to get in the shot, you can see what the paint looks like without the flash bouncing off it as well. (You can also see that I do not have, nor will I ever have, matching towels.)

Here's the shot I took of the wall behind the washroom door, after I'd spackled but before I'd started painting:


This was the worst wall for filling in holes left by unused towel racks and the like, but two other walls had spackling too. You can see why I had to repaint.

The new green is surprisingly neutral, not too dark (despite being on a "dark colours" paint card), and hasn't come off in the shower yet.

This means that I'm officially done the "stuff I meant to paint" part of the redecorating of this apartment — the main living area is exactly the colour I wanted (a pale yellow tending towards cream). I was pretty lucky when I bought this place: the previous owner had done some lovely upgrades, everything was in good repair, and the colours were along the lines of what I liked. Except for a dripping tap, nothing has had to be done with any urgency. Everything else that I would like to do is a) expensive and b) involves hiring people, so I plan on holding off for a while, at least until I get better organised.

drat. by Katherine Hajer

The cliché is that there are three kinds of lies: lies, damned lies, and statistics. In actuality, there is a fourth: paint chip cards.

I really liked what the previous owner of my condo had done with the washroom. The vanity countertop is a mix of greens and a brown-beige in sort of a marbled pattern. You can see it used as a background in a lot of my beading photos, like for this post. She'd painted the walls a warm sage green that had lots of beige in it. It looked great with the counter-tops, the pale grey tile floors, and the white trim and porcelain. Normally I don't go for warm tones, but it looked great with my red poppies shower curtain and vanity set.

The only thing I (respectfully) disagreed with the previous owner about was the towel racks. You see, she liked brass, which is the one finish I absolutely can't stand. I'm more of a pewter/stainless steel person.

I took down the brass hooks on the back of the washroom door and replaced them with pewter ones fine, but there were a lot of towel racks to take down — a grand total of four. In addition, there were lots of clusters of pin-holes in the walls where thumbtacks had been used to hang up small pictures. I had to do a lot of spackling on both of the main walls. The only recourse was to repaint.

I spent a lot of time holding up paint chip cards to the walls, and settled on a colour. The local paint store, who had stood me so well back when I repainted my bedroom, let me down. They kept recommending light, very light colours for the bathroom. From a decorating point of view I understand, because it is a small room with no windows, but that vanity counter really needs something to pull it together with the rest of the room. I am not in a financial or aesthetic situation where I can think of replacing the vanity counter. Besides, I like it.

The quart of paint I bought looked like trouble as soon as I opened the lid, but the staff at the paint store had assured me that the colour would darken considerably as the paint dried.

They lied. The first wall I did is touch-dry now, and it's much lighter than what was on the paint chip, never mind the warm sage green I was going for. It's white. It looks like primer with a slight sage green tone. It makes the washroom look like it's the staff washroom in a sub-par retail outlet.

All right, all right, I know that colour is never guaranteed when you buy paint, but this isn't even close. It is several shades lighter than the original colour, which I knew I wasn't going to match perfectly, but wanted to get as close as possible to. Now I'm going to have to repaint entirely, possibly even use two coats to cover up the debacle currently gracing the walls.

The only good news is that the room takes less than the length of one CD (the Trainspotting soundtrack, if you really want to know) to paint, albeit with less than my usual care in the corners because I was annoyed when I was doing the work.

I would post photos, but photos don't tend to turn out well because of the aforementioned windowlessness. The flash distorts the wall colour a lot. I will, however, try for photos when I finally have my happy ending to this adventure and get the damn walls the colour I want!

somewhat instant gratification by Katherine Hajer

The square peyote stitch component featured in the February 2010 issue of Bead & Button was an instant favourite with me. If you read the article and instructions about it, you can see how versatile it is. In the magazine they tell you how to make three different kinds of bracelets with it, but my first thought was that it would be a great base for an earrings and necklace set.

Something about beaded jewelry makes my egomania come out. Even though I do seem to like some classic, everyday-ish beaded jewelry that looks like it's from the 1940s-1960s, I also have this knack for making ornate stuff that's more like poor glass-bead cousins of more glamorous metal-worked pieces made for medieval royalty or something.

Today I made the earrings part of the earring-and-necklace set. I added a short dangle to the component with a matching glass drop bead. The flash distorted the colours (someday I will figure out how to photograph beaded jewelry easily so the colours come out right), but the blue beads, including the glass drops, are deep cobalt blue, while the metallic beads are a pale copper that looks more like a red gold. I used copper findings, including copper wire guards at the top of each component so that they would swing from the earring wires properly — a trick I picked up from a previous issue of Bead & Button.

The square component is dead quick to make, but it took me a couple of tries to get the finding and dangle attached in a way that pleased me. Originally I was going to use copper jump rings to attach the glass drops (ie: no seed beads), but it turned out that the jump rings I had on hand were too thick to go through the holes in the beads.

The finished earrings are a third try, but since each try took under twenty minutes, it was still quick as handmade things go.

everybody loves a history by Katherine Hajer

One of the things I love about needlework is that there's so many different directions to go in it. You can leap off the deep end and make "clothing" that's absolutely unwearable, even if it looks very cool. Or you can go super-traditional and make stuff that got figured out centuries ago, using much the same materials and tools that would have been used on the first attempts.

Then there's the very interesting middle ground: making things based on very old work, but putting a new twist on it.

I've done a bit of the last two recently.

Lately I seem to have been collecting up men's sock patterns from the 1950s for No Good Reason. It just seems deadly important that I have them.

I made the ever-storytelling Howard a pair of socks from a pattern published in 1950. The needles I used were most likely bought between 1955-1960. They were my grandmother's, in Imperial measure, and not a size she used much after 1965 or so, so she must have got them after moving to Canada, but before metric needle sizes came in around 1970. I tried to pick 1950s-style colours, and used "normal" sock yarn: 80-85% wool, 15-20% nylon. Sock yarn hasn't changed much since nylon was invented, although of course nowadays it's harder to find the 3-ply stuff, so I did use 4-ply.

The original pattern was called something like "Men's Socks with Geometric Clock Pattern in Two Colours" or "Pattern #12," so I have taken the liberty of renaming them the Kerouac Socks. Jack Kerouac may or may not have ever worn hand-knit socks (he was a Quebecois! he must have! but I have no proof), but these are socks of the sort he would have recognised back in the day. Just like most men's colourwork patterns I've found from the period, you knit the leg straight, using the intarsia method for the colourwork, then sew up the back seam, do a standard heel turn, and finish the foot in the round. I did one-stitch garter stitch at the beginning and end of each row of the leg to make it easier to sew up and to ensure I had a perfectly flat seam at the back of the leg. Which is to say, when Howard wears them it will feel like the socks have no seams at all.

Bamburg


Meanwhile, after two and a half years of whinging about it, I finally made myself a new pair of gloves to replace a pair that moths ate. The old pair were my first attempt at mittens designed by Anna Zilboorg, so it took me a while to get over them.
These are Bamburg, and the pattern is from an issue of The Knitter magazine that was out around the end of 2009. The design is based on medieval knight's gloves, and the description in the magazine pointed out that the geometric patterns that were practical on the metal gloves used with suits of armour are the same patterns used in Selbu knitted glove designs. How cool is that?

The palm side is a Selbu pattern that when used as a texture on the medieval metal gloves made lances and swords easier to keep a grip on:

I like how the thumb has its own pattern. Most people who have seen my rendering of the gloves say it's a smaller fleur-de-lis to go with the bigger one on the back of each hand, but to me it looks more like a stalk of wheat. Chacun à son gout and all that.

By the way, although I didn't photograph it separately because it's just plain black knitting, the inside of the gauntlets are lined (the hand part is not). Practical.

There's a lot more vintage stuff I want to make, but as usual I'm moving forwards in all directions. The next two things to get done are both less traditional-looking. Well, okay, maybe one is and maybe it isn't, but when I blog about it you can decide for yourself.

These gloves are Part 1 of my Bronze-level medal for the Knitting Olympics. I know some people are following rules where there are no levels of medals and either you get achieve your goal or you don't, but as usual I did it My Way (cue the Sid Vicious version).

knitsploitation by Katherine Hajer

I've been trying to explain this for years, and I keep on failing. But here I am, trying again.

It seems like no cultural activity is safe from exploitation by those out to make a quick buck. From food to sex to sports to work, religion to politics to a fondness for puppies: there are calendars, coffee mugs, t-shirts, and countless other tchotchkes trying to divert revenue from the main thing people want to spend their money on to some useless "themed" item.

So the person who loves golf gets bookends made to look like golf clubs. The cat aficionado gets a sweatshirt with a romanticised picture of kittens on it. And knitters get earrings shaped like balls of yarn, bookmarks that say "I'll start reading this again as soon as I get to the end of the row," and books with people talking around knitting, rather than about knitting itself.

I can't stand any of this stuff. Here's just a short list of the reasons why:
  • I knit the way smokers smoke. It's a nervous habit that I find relaxing. The main difference is that at the end of an evening, I'll have a sock done whereas the smoker will have a full ashtray. That really is the main difference.
  • I knit because I am a tall, big woman. I learned to knit when I was about nine. I stopped growing (at 1.75m, taking a North American size 14) when I was 12. If I wanted a sloppy fisherman-knit sweater, the kind that was popular when I was 12, I was going to have to bloody well make it myself. For the kind of knits I like to wear, that still holds true today.
Furthermore:
  • I resent the pop culture norm that "real knitters don't knit with acrylic." I have had the honour of knowing several master knitters who knit exclusively with acrylic. They were all old enough to remember when substandard wool was the only option, and they were thrilled when the synthetics came on the market. Maybe you disagree with them on their fibre choices, but that doesn't make them bad knitters. I for one am grateful to have the choices of fibre we have today, and that includes working in synthetics when it's the best tool for the job I want to accomplish.
  • Furthermore, I really hate it when people are snobby about not working with acrylic, but cheerfully buy off-the-rack clothes made with synthetic fibres. You know who you are.
  • I also resent the consumerist attitude that says knitting today is more about buying yarn and less about making stuff. I like making stuff. The purpose of buying yarn, for me, is to make stuff. It is not to "fondle", or satisfy an "addiction", or any other sex/drug metaphor people want to use to cover up buying habits they seem to be vaguely ashamed of. Sure, I like a nice skein of nice fibre as much as the next person. But I'm not going to buy it unless I have some idea of what I want to do with it.
  • Most of all, I hate the assumption that knitting today is a "hobby," a "pass-time" that no-one "has" to do. If I want the clothes to fit, I have to make them myself, or else hire a dressmaker, or else shop somewhere that is very well stocked in the medium to larger sizes. If I want cardigans with sleeves that go down to my wrists, I'm going to have to make them. "Hobby" is a put-down for all the years I've spent making sure my skill levels were good enough that I could make things that didn't scream, "this was hand-made by a non-professional."
I have been knitting for 75% of my life. I knitted in high school between classes and put up with other kids calling me "Little Suzy Homemaker," growling back at them (long before Lily Chin appropriated it) that I was an "urban knitter" who was "in it for the fashion." In university I used knitting to convey character during drama class. During my first career as a high school teacher, the half-hour of knitting on the bus to and from work was my only leisure time on workdays, and ensured I'd have something comfortable and decent to wear to class while I tried to cover rent on a part-timer's salary.

For the first twenty years of my knitting, my grandmother was the only other knitter I knew. I raided the public library for books to teach me techniques (Oma lived an hour's drive away and wasn't always there to show me how to do things when I was ready to learn them). We made our own knitting culture, creating work that was about a good job done and the usability of the finished product. We had no trends, no peer pressure, no romance of an imagined "tradition". We just knew hand-made socks were superior to the store-bought ones, and that machine-made hats don't keep your ears warm in Canadian winters.

Now hawkers of "heart-warming" books want me to buy their wares so they can tell me amusing anecdotes about uneven stitches (uneven stitches? I can't make them if I tried, not the way Oma taught me to work them), mother-to-daughter bonding (my mum hates knitting, and my grandmother was taught to knit at school, not home), overcoming "fear" (Oma gave me a bagful of odd balls so I could experiment before working a usable item. I never had a chance to be afraid.). Finally, they keep insisting that knitters are helpless to resist when it comes to buying yarn, even if they can't keep their tension consistent for the length of a row, never mind a whole sweater.

It makes me angry. They are taking my lifelong nervous-yet-constructive habit away from me, then distorting it to push the consumerist angle that it is better to be a good yarn buyer than a good knitter. They are insulting me by telling me that people with seven years' experience in this 800-year-old craft are "experts," even though my thirty years of knitting makes me feel like an intermediate who is finally getting the hang of it. They want to infantilise me and take away my hard-won expertise, my ability to judge what is right for me to create and spend my money on.

Hence "knitsploitation." Like "sexploitation," it's taking something people like and then twisting it until it's merely a set of consumer goods. And like the cigarette smoker who wouldn't necessarily appreciate a book on modern tobacco cultivation, the last thing I need in my life is a book trying to give me the warm fuzzies about a craft that is already warm and fuzzy all on its own.

Make it stop.

blocking en masse by Katherine Hajer

Some people block their knitted stuff just as a matter of finishing it — just one more step towards the end, like darning in the ends.

I was always taught that if you have to block it, it means you did a crappy job knitting it in the first place. Knitters who claim you have to block to "get rid of uneven stitches" make me cringe. How about just not making the uneven stitches in the first place?

My mum told me recently the lace scarf I made her had been admired by a friend of hers, but was astonished that I did not iron my work. Iron? Iron? It's got bobbles in it! And it's made out of Kidsilk Haze! Even the biggest blocking fanatic won't iron bobbles, especially ones knitted into yarn of silk and mohair.

Apparently I have found one who would.

One of the tricks with craftsmanship is knowing when to deviate from your usual best practices, though, and I recently made four things that require blocking. Not ironing, mind you (shudder) —just some stretching to get them in the right form.

Three of the items are Estonian lace: two shawls and a scarf. One is a beret in stranded colourwork.

I waited until I had a nice, quiet stretch of time. In this case, it was Christmas Day. That might shock some folks, but I had a perfectly nice winter solstice celebration on the 20th, thank you.

I woke up, brushed my teeth, and got to work.

Soak

I gathered together everything I needed to block, filled up the sink with cool water, added Soak, and set a timer for fifteen minutes.
Note: Normally soaking several different-coloured items together like this would not necessarily be a good idea, because dye can bleed out and discolour other items. Since all my items were in the same colour range, I decided to risk it. Nothing bad happened to the knits themselves, although the jury's still out on my bedsheet.

During the fifteen minutes, I stripped the bed, put on an old fitted sheet, and scarfed down some breakfast.

Then the pinning started. Some knitters block things lovingly, measuring and re-measuring. I'm more of the school of "er, yeah, looks right, and I'm sick of pinning so I'm going to use some blocking wires now." Here are the two shawls blocked out on the bed, both using a combination of pins and blocking wires:
What's impressive about both these pieces is that they were half to two-thirds the size on the needles before blocking. Lace can be weird that way.

The beret got popped over a dinner plate. I tried just putting it on the mattress with the shawls, but it was draining too much water, so I set up my drying rack and put it on that.

By the time I got to the scarf, I had run out of room on the bed. Also, the scarf is made from Handmaiden Sea Silk, so it tends to smell like seaweed when wet, and I didn't want the smell near the shawls. so I just draped it over the top of the drying rack and gave it some tugs to set the width:
Yes, my living room looks like a workshop.

As of this writing, everything has been drying for about an hour and a half. I'm going to set this post to delay publishing until the first week of January. With any luck, the three items here that are gifts will be in their recipients' hands by then.

I'm not sure how long things will take to dry. If the stuff on the bed isn't ready by tonight, though, at least I have my sofa bed to sleep on. DIYers need sofa beds.

bling! by Katherine Hajer


Usually I don't like beadwork that is too over-the-top. I admire the artisanship that goes into making elaborate neckpieces (if it gets big and artistic-looking enough, it's a "neckpiece," not a "necklace"), but I wouldn't want to wear them.

The Ice Blossoms bracelet (sorry, subscriber-only) is about as rococo as I would ever want to get with jewelry I would actually wear. Even though I decided to use cheap acrylic crystals instead of the Swarovski ones called for in the pattern, the thing is still plenty heavy and drapes nicely on the wrist. The original pattern calls for seed bead fringes around the centre stone in each main motif, but I thought it was ornate enough without them.

I've been making so much stuff in my usual blacks, reds, and purples lately that I decided to branch out a little and make the bracelet multi-coloured in lighter colours. I like the results, but would also love to see it done in more Gothic colours: all jet black, or dark red crystals with amber seed beads. It would probably look good in the cobalt blue that's currently popular too, or the earth tones that are popular in the beading world right now.

The thing I like the best about wearing the bracelet is that the big main motifs are flexible, so they curve to fit your wrist. This is a lot more comfortable than a similar bracelet would be made of same-sized pieces of metal.

Most of the beading is a variation on right-angle weave. You backstitch your way through making different loops, and then frame them in more beads to stabilise the loops and keep them all on the same horizontal plane. The blue beads closer to the clasp were not in the original pattern; I added them to make the bracelet a bit bigger (normal-sized bracelets fit my wrist exactly with absolutely no ease).

I found these ornate toggle clasps for $2.50 for ten clasps. They go great with the ornate style of the bracelet.


More beading stuff

I finally found a way to get seed beads back into their bottles without losing half of them into the carpet. Teaspoons are too big for the job, but if you can find a little souvenir spoon, they work great! They're small enough to fit into the standard medicine-bottle style of seed bead containers, but big enough to scoop up a decent amount of seed beads at once:
Finally, a reason to collect those spoons.

a learning experience by Katherine Hajer


Rypan Designs seems to be taking over my entire beading life. Since they seem to be pretty good, maybe that's not entirely a bad thing. I just finished making this vintage-style bracelet based on one of their kits. The kit uses size 8/0 seed beads; I used size 11/0s because I tend to use size 11/0s for everything. It makes for a narrower, more delicate chain. Arguably I could have stuck with the 8/0s and made a wider chain that probably would have suited me better, but I liked the smallness of this when I was done.

The black beads in the photo aren't really black. They're clear but very dark brown and kind of remind me of Coca-Cola. I meant to buy black and at first I wasn't sure about the choice, but in the end it somehow makes things more vintage-y and I like the effect, especially since the petal beads are matte and the centres are metal-lined.

This is the first time I have worked peyote stitch and gotten it to wind up looking like peyote stitch, instead of a very sloppy and ill-formed herringbone stitch. Making the side petals (the parts of the daisy that stick out from the main ribbon of stitching) work took about eight tries, but eventually I was able to form them consistently.

I seem to have a thing for beaded daisies at the moment. I'm currently working on a modified version of a Bead & Button download (first search result; it's a subscriber-only download, sorry), using those size 11/0s instead of the 15/0s the pattern calls for. The photo will probably be up eventually. The current bracelet-in-progress has a ladder-stitch base of bugle beads. The daisies float on their centres above the base, which makes them sort of bobble-headed, but in a nice sort of way. I'm looking forward to seeing how the finished product works out. The thing about working these daisies is that you have to expect and welcome some variation into each motif — unlike other stitches, it doesn't work if things are too uniform. Which is good, because the inexpensive beads I insist on using won't give uniform results no matter how well I stitch them.

modern is traditional by Katherine Hajer

"Modern or traditional?"

I hate that question. It divides all tastes with a hard line that has the Victorians and all that came before them on one side, and the modernists on the other. For the former: embellishments everywhere, natural materials, a complicated palette of tertiary colours. For the latter: everything stripped down to absolute basics, man-made materials, primary and very simple secondary colours.

It completely leaves out all the joy of juxtaposition you get when you take that hard dividing line and try to blur it a bit. Which brings me to my latest finished objects:

Gothic cross necklace


This was made from a kit I got at a beading expo a couple of weeks back. It's by Rypan Designs Beadwork, and, like all their kits, was very easy to put together. I like how they use basic beads to make their kits, so that after you make the first one, you can always make more to justify the cost of the kit to yourself. Their three-drape Victorian Gothic necklace was the first beading I ever did, and I've made at least half a dozen versions of it since.

Henry VIII collar


This design came from The Anti-Craft. You can check the link for their explanation of why it's called Henry VIII. I like that it uses up almost an entire vial of seed beads -- great way to stash-bust! The first two rows are completed simultaneously using a two-needle technique, which is nice because after the relatively slow start, the next two rows zoom along. I went for plain glass drops, but there is a lot of potential to change the look of the collar by using different colour combinations and drop beads.

Hemlock doily (1941)

My bedroom furniture is a great example of the modern-is-traditional aesthetic. It's from IKEA, so you can bet that not a single scrap of materials is superfluous, yet it has the scrollwork and bedknobs of a Victorian metal bedframe.

In this set, the wardrobe and night-stands are metal and scrollworked as well, plus the shelves have punched-hole patterns on them in the shape of Scandinavian eight-pointed stars. The metal seems to pick up dust like crazy, and I've been looking for tablecloths for a long time. I've never found any that I liked, though.

Then it occurred to me: the ever-knitting Emily at the Naked Sheep took a vintage doily pattern and worked it in a heavy worsted-weight yarn to make a shawl. What if I took the same pattern and worked it in the original fine crochet cotton to make a doily?

Emily told me where to find the pattern, I guesstimated that I would need one size larger needles than what the original called for to get the size I wanted, and off I went.

This is an extremely quick knit. I started on a Sunday and was done by the following Thursday.

The only thing that took me a long time to get around to was the pinning out and starching. I finally pinned out the doily on my bed's mattress (with a fitted sheet underneath it!), sprayed the starch on, and let it dry by itself. That worked perfectly. You can see in the final photo that I decided to make it a bit pointier than the original.


my (unblocked) Hemlock with Emily's shawl at the Sheep


the blocked & starched Hemlock doing dust-prevention duty on my night-stand

Now I just need to make another one for the other night-stand!

More things I've finished lately by Katherine Hajer

Some of these things have actually been off the needles for months, but I would set up stupid "efficiency" tasks for myself like: "Oh, I'll darn in the ends on these when I finish that other pair of socks I have on the needles," and then I would go off and work on something else, and both projects would languish. But here's the latest this week:

Bacchus socks


These are from the Fall 2008 issue of Interweave Knits and are the first socks knitted from the toe up that I've ever got to fit a human foot. I like the idea of having a full toolkit of methods for knitting, but I really don't get why people are fanatical about toe-up socks. Then again, I still don't get why people are fanatical about knitting in the round, even though I'm knitting in the round a lot myself lately (although expecting that to change somewhat this fall when I start making sweaters and jackets again).

I'm not the biggest fan of making bobbles, but these were no more than two bobbles per round, so it was fine. I like the use of ribbing to make the whole sock a bit more shapely. I had to make these wider and longer than what the pattern called for, but everything worked out in the end.

Celtic knot socks

These are from the same issue of Interweave Knits as the Bacchus socks — lots of great patterns in this issue! These were also written for toe-up construction, but since the texture pattern is symmetrical, I knit them cuff-down since that was easier on my brain.


Beaded earrings

I bought all the beads and findings for these a couple of years ago, and they've been languishing in my bead box ever since. One night I spontaneously decided I was sick of them using up the space in the bead box, pulled out my pliers, and put them together. I had to redo them once (but only once). In the end they seemed to turn out:

French Girl lace jacket

I finished this one a while ago, but (as you can see) have been having trouble photographing it. To make this one, you knit two halves —cuff to centre back, and then cuff to centre back for the other side — and then knit the collar separately, using a three-needle cast-0ff to attach it. The three-needle cast-off is what gives the jacket structure — there are absolutely no seams anywhere else. My two big modifications for this one from the original pattern were to make it long-sleeved and to add a garter stitch border to the bottom, instead of the single crochet originally called for.

The back gusset adds some nice shaping to the jacket and makes it a bit more difficult to see where the graft line is that joins the two halves at the back (it's along one side of the gusset and up the centre back).The collar is made from the twisted edge up and then joined with a gathered three-needle cast-off. I'm finding French Girl Knits has some great construction ideas that make you think "Hey, I could use that for..."

Now what?

I started my first knitted doily today, and even though I took several hours out to visit some friends, I am still 60% done by the round count. The rounds are getting bigger and bigger, of course, but there are also more plain rounds, so the progress has actually been pretty linear.

I'm also working on another French Girl constructed-in-two-halves jacket. I need more jackets, and since I am sitting down in a cubicle most of the day, I prefer knitted ones. It would be loved to post finished photos of both of these soon, because that means they're getting used!

Old-fashioned skills in the age of small appliances by Katherine Hajer

My youngest brother recently moved to an apartment with less cupboard space, and so I inherited his breadmaking machine. The manual got lost a long time ago, and it doesn't seem to be available on-line, but I found some tips for "operating any bread machine" and some basic recipes.

This morning I threw all the ingredients into the machine, set it for a basic whole wheat loaf, and pressed the start button. Everything seemed to be going swimmingly until I followed the recipe instructions about checking the dough's consistency.

The instructions said that you were supposed to pause the bread machine (like lifting the lid on a washing machine, I suppose) and check how sticky the dough was, then add either water (for dry dough) or flour (for too-sticky dough) until the correct consistency had been achieved.

So I opened the lid... and the bread machine kept kneading away. I poked at a part that was nice and far away from the mixer blade, and it was definitely too sticky, so I added some flour and closed the lid.

After a few minutes, just like the instructions said, I checked again — still too sticky. This time I pressed the Stop button to make the machine stop long enough so I could be super extra sure that the machine would mix in the new infusion of flour properly.

But when I pressed the Start button, the machine screamed at me and started blinking "H-E", which I guess is some sort of error. It wouldn't start no matter what. Apparently on this model, Stop really means "something awful is happening! STOP!"

I dug the dough out of the machine's baker thingy, threw it in my favourite bread-mixing bowl with some flour, and kneaded it until it was the right consistency. Then I tossed a tea towel over the bowl and let it sit for 30 minutes, before shaping the loaf and putting it in a loaf pan. 45 minutes later I had a perfectly nice loaf of bread with a crumb density that is perfect for sandwiches:


Next time: must remember not to push the button, or not use the machine.

Things I've finished lately by Katherine Hajer

I've been having trouble finishing DIY things in the last few months. Not finishing, the part where you seam and darn in ends — that part is enjoyable, and means the bulk of the work is over if you've done the job right to begin with.

No, this is more like: getting an idea, diving into the stash, rummaging amongst the needles until I find the right size, casting on, getting 50-80% done... and then repeating the same process from the beginning. It's getting to the point that I'm "missing" some needle sizes because all the available pairs have half-finished work hanging off them. Not good.

I think it might finally be coming to an end. Not only do I feel like finishing things, but I actually am finishing them. Some things are more finished than others:

Unintentional beaded flowers

Note: these are made from seed beads. They are sitting on the wrist rest of my laptop in the photo. Think small and finicky.

I couldn't sleep one night, so I decided to look through pattern books I already know well —I find the photos pleasant, but because I already know the material, it's boring enough to make me sleepy.

On this particular night, I was looking through a copy of Bead & Button and found the instructions for these seed-stitch flowers. All of a sudden I had this brilliant idea: to make a lot of seed-stitch flowers, sew them over a wire frame with seed-stitch mesh in between, and make a funky lampshade for the bare light bulb in my laundry room!

The ideal would have been to write the idea down and go to sleep. Nope. Couldn't. So I got up around midnight, pulled out my beading stuff, and got the pink-pearl flower with the burgundy centre done around five AM. I would have been done early, but this was my first attempt at brick stitch and the thread got so tangled I had to start over after completing just one petal. The burgundy flower with the turquoise trim went more quickly.

No, I never made the lamp shade, although I did pick out some lampworked beads from my stash so that I wouldn't have to make several dozen flowers just to cover one light bulb.

Dishcloths

I've been needing new dishcloths for a while, so these were intentional. Usually I just do the cast on three stitches, do an eyelet edge increase 'til it's wide enough, decrease back to three stitches kind of dishcloths, but I liked the 1950s factor on these spiky petal ones (think starburst clocks and things knit sideways in short rows to make a circular shape). They are dead quick, and somehow only use about half a ball of standard dishcloth cotton. The green one is made from Bernat, the blue and yellow ones from Lily Sugar 'n' Cream, and the multi-coloured one is an attempt to use up the leftovers. I still have another leftovers one on the needles, and it looks like I'll have enough yarn and then some.
One thing I am irrational about: dishcloths must be reversible. The multi-coloured one bothers me a bit because the colour changes aren't the same on the other side (physically impossible in knitting, of course, although one can minimise the effect). If you graft these to finish them instead of seaming per the pattern, they're almost exactly the same on both sides.

French Girl cover jacket... and other stuff

I've been really getting into the designs in the French Girl Knits book. They're all seamless without going to convoluted lengths just to be seamless —the seamlessness is worked sensibly into the design. I made some mods to my version, but since none of the photos I took of this this morning turned out, that will have to be another blog post. This one has run long enough!

easy stuff by Katherine Hajer

I recently picked up a copy of Nancy Bush's excellent Knitted Lace of Estonia, and already have sticky notes on various pages, marking off the ones I want to make first. So far I have one project done, one on the go, and a third one slated to be done next. All are made 100% from stash yarn.

The scarf in the photo was the first thing I finished. It was a birthday present for my mum, made from the same yarn and to go with the lace beret I made her. The scarf weighs in at 31g, so the beret and the scarf together weigh less than a typical beret does on its own. For some reason I find that very satisfying — it reminds me of those catalogues for camping gear that list the weight of each item along with loving descriptions of the "space-age" material it's made from. Here's something that could have been made any time in the last 800 years and it's remarkably light, plus it can be folded into a very small space for storage.

As near as I can tell from the book, Estonians have a lock on how to do lace so that it's fun, quick, and turns out well. They always alternate one complex "pattern" row with one simple one, which makes for a nice rhythm, and the patterns are very quick to memorise. I don't do lifelines, so the knitting rushes along. To be perfectly honest, there are a few mistakes where I shifted one stitch over here or there, but a judicious increase-this and decrease-that straightened everything out again, and they don't jump out at you when you look at the scarf.

Because the Kidsilk Haze is so airy, the nupps (knobs, the flat bobbles you can see along the lace patterns) are very faint unless you hold the scarf up to the light, which explains my choice of display arrangement for the photo. They do add to the texture, though — just more subtly than if I'd used a more substantial yarn.

For anyone skittish about trying out lace (why?) I recommend an Estonian scarf pattern.

fun with glue guns by Katherine Hajer


The other night the ever-creative Carla and I went to the Linux Caffe and took a workshop course on how to make jewelry out of old electronics parts. The workshop wasn't held in the café proper, but in a room in the same building that felt like one of those workshops created from a garage (although in this particular case, it wasn't). There was a big heap of electronics in the centre of a large table, plus jewelry findings and some mismatched jewelry beads. We were also given a box full of various cutting, gripping, and bending tools to break apart and shape things. Finally, there were a couple of glue guns to attach things in new ways. The instructor gave us some pointers on how to work things, explained a few basic safety rules (power tools = wear safety goggles), and we were off.

The group at the other end of the table lucked out and found some parts that were lined with copper. They cut the copper lining into strips and made all sorts of things with it.

As you might be able to tell from the photo, I wound up making all of my stuff from a single controller board I found. I liked the dark green color, and it was thin enough that I could cut it into pieces with a regular pair of scissors. That let me be a bit more precise — check out the rounded corners on the brooch for proof.

I glue-gunned all the pieces to jewelry findings while I was there, then did a little refining once I got home. I added the earring hooks myself at home, and I added the extra jump rings to the necklace pendant so that it would fit onto my favourite necklace chain. Because I kept things so minimal, I wound up being done way before everyone else, but I was happy with the results, so that was okay.

Normally I don't like to do glue-type DIY stuff, just because of the hordes of "crafts" which involve gluing together a few pre-fab pieces, but this was pretty satisfying. I think it's because you have to decide how everything is going to work together yourself.

What's been interesting to me is the reactions I've been getting. People have generally been very positive. A lot of people have wanted details so they could make their own. It's all very cyberpunk à la William Gibson's novels, but it works in real life.

reversible clothing by Katherine Hajer


When I was about seventeen, I tried to design a reversible sweater using a chevron rib stitch. I completely forgot to consider how narrow ribbed fabric gets (tension swatch? what tension swatch?), and gave up halfway up the back or so. When my mum told my Croatian grandmother about it, she told me about this fabric that used to be sold at the market when she was a little girl. It was cheap stuff, not very well made, and it had one pattern printed on one side, and a different pattern printed on the other side. She thought the idea was you could make something out of it with one pattern showing, and then, when that was worn out, make a smaller something by taking apart the original item, and letting the other pattern show. That way it wouldn't be as obvious how thrifty you were being. She also said her father wouldn't let anyone in the family buy any of this fabric on point of pride (ie: it was for poor people, not them).

I learned a few things from this:
  1. It's not good enough to make a reversible fabric. You have to plan a reversible garment.
  2. If you're going to make something reversible, make it very cool-looking, so no-one can question your motives.
I've already had one reversible sewn jacket: a light swing coat my mum made me one year as a New Year's present. I did tend to wear it only one way out, but it was fun to show off, and nice to know that if I spilled some of my lunch on it, I could always turn it inside out. Me being me, that happened a few times.

Now I've got a copy of M'Lou Baber's Double Knitting (scroll down). Every single item in it is reversible, including the hats and bags. The photo at the top of this post shows how far I've gotten on the Central Park jacket, which has these gorgeous Art Nouveau trees and birds knitted into it. The bottom part is the tree roots. Then the foreground and background colours switch and show the trees reaching into the air, with the stylised birds flying between them.

In case you haven't done double knitting before: The technique itself just feels a lot like doing K1, P1 rib, and goes more quickly than you might think. There's absolutely no stranding or colour weaving involved, because you're always using both colours equally. I'd actually say it's easier to get into than other colour techniques like intarsia and stranded colourwork. The finished items in this particular book have no seams, which is a bonus for the anti-seam brigade. For this type of knitting, I agree seamless is the way to go, just because if you were seaming, you'd need to match two mirror-image seams stitch for stitch if you wanted it to hang right, and that would be trickier than the seamless alternative. As always, I prefer the best and simplest tool for the job.

I'm looking forward to posting the finished jacket here!

adventures in home wiring by Katherine Hajer

My bedroom just had one of those standard square ceiling lamps that have been produced in exactly the same way since at least the 1960s: white, the size of an occasional pillow, and with fine scroll design painted along the edge that never went with anything and never will.

As previously blogged about, I painted my bedroom, and the next step was to find a light fixture that contributed to the vaguely "hotel room in Nice circa 1908" vibe I have going, but was bright and fun like the paint on the walls*. I'm really big on waking up in a room that makes me feel happy, and wanted something that would be bright and cheerful in the dark Canadian winter, but fun in the summer too.

This lamp is from the IKEA children's section. If I cut all the beads off, or replace them with more sedate ones, I could get a grown-up look from it. I like how the not-quite-matched beads look, though, and it goes well with the rest of the colour scheme. Besides that, the scrolls go with my furniture, and there's not a single speck of brass on it (I hate brass).

I did the wiring myself, with only one tech support call to my brother Rob, who knows much more about these things (in my defence, the wiring in that socket looks safe, but a little non-standard as to colour coding). The worst part — once the wire colour mystery was solved, anyhow — was trying to get the cover at the top of the fixture to hold all the wires in place. I took down the lamp just this morning, rearranged some of the beading, duct taped the lamp wire into place under the cover, and then replaced the whole thing. I'm still not confident it won't start to sag in the next 24-72 hours, but we'll see.

* This photo shows the paint colour better than previous ones, but it's still too blue. The actual colour has some green in it — hence the ocean resort theme.

About socks by Katherine Hajer

It's -15C outside my apartment as I write this, and Toronto has been in the throes of the annual "deep freeze" weather for over a week now. I don't like to moan about it — it happens almost every year, so it's not exactly a surprise. What does surprise me is how people deal with it.

I just finished the Noro socks I started last April, and am wearing them right now. They're warm in a way that only natural-fibre items can be — my feet just feel nice and comfortable, but not hot the way that synthetics will do to you. They're plenty thin to wear in my winter boots without pinching, and being Noro, they have the same colours in them, but not in the same order, which is pleasing.

Call me smug, but I find it rather sad that there are lots of people who live in this city, under the exact same climate conditions as me, in the exact same income bracket, but who will never get to know how comfortable and pleasant wearing a simple pair of hand-made socks can be. From the custom heel and toe shaping, to instep shaping if you really want to, they fit better than machine-made socks, no contest. The colour and pattern combinations are way more fun than what's offered in finished socks. And, despite being asked several times over the years, I still have no idea how long they take me to knit because I just work on them during all my in-between times: commuting, waiting to be served in a restaurant, even waiting in line at the grocery checkout. I do know from the pairs I've made for gifts and from historical accounts I've read that they don't take long.

So: if you've been holding out on socks because the smaller needle and yarn size scares you, or because of fitting issues, or because you just don't understand the appeal... the work is light and the wearing very rewarding. I didn't make socks for the first fifteen years that I knitted (there was one abortive attempt when I was seventeen, but that had other factors going against it). To me, there was an element of tackiness to it, like knitting golf club covers or doorknob cosies.

But now that I've worn them, there's just no going back.